The next step is identify the objects in your images by "tagging" them. You can manually tag each image but this is very laborious. To use Auto mode, first make sure an automatic alignment mode is selected in the Match Tab. Then open the drop list and make sure the Apply to Group item is checked. Now whenever you tag an object on one image, it will automatically be tagged on all images.
The tagging procedure is the same whether you are using manual or automatic tagging; however the manual mode is much more laborious. If you are manually tagging then you can also turn on the Auto Advance option in the drop list. You will be moved to the next image every time you tag an object.
Before you start, make sure the Snap to Centroid check box it turned on. For optimum measurement accuracy it is important to have the measurement annulus accurately centered on the objects; Snap to Centroid will do this very accurately. The Photometry tool uses partial pixels and median-mean techniques recommended by the AAVSO for the highest accuracy.
The measurements are performed by comparing the star against a background annulus. You can adjust the aperture and annulus size, as well as the gap between the two, by pointing the mouse at the image and using the right-click menu. This is the same as for the circular cursor used with the Information Window.
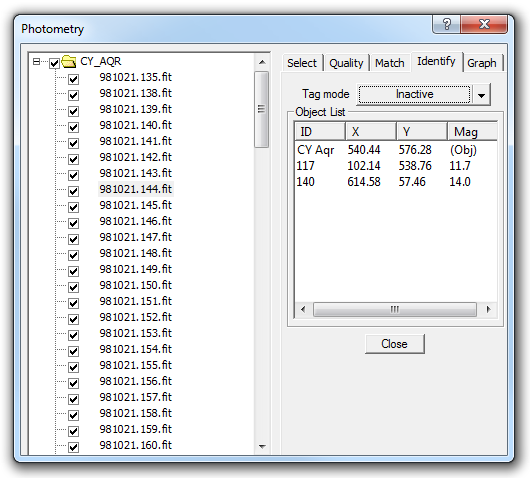
To start tagging, select the image you would like to work on by clicking it in the tree view.
You can tag an object by clicking the Tag Mode button and then click on the object in the image. Alternatively, you can right-click on the object and select a tag mode from the right-click menu. The available tag modes are:
New Object - select a new stationary object (e.g. star). A new line will be added to the Object List, and you will be prompted to type in a name. This is the name that will appear on the graph and the reports.
New Moving Object - select a new moving object (e.g. asteroid). This works the same as for New Object, except that the auto-tagging algorithm recognizes that the object will move from image to image. Moving objects must be manually tagged on at least two different images to enable the Photometry tool to calculate a "track" giving the probable location of the object at the time associated with every image in the set. For best results, you should usually tag moving objects in the first and last images of a data set.
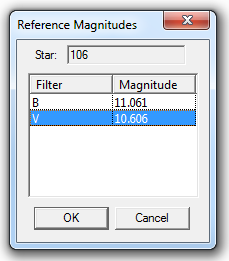
New Reference Object - select a new reference object. If you have more than one filter group for this object, a Reference Magnitudes dialog box will appear, which will allow you to specify the known magnitude in each band. If only one band is available then you can enter the magnitude directly in the Object List. You can also give the reference object a name. You can select more than one reference object; if you do so they will be used together ("ensemble photometry") to determine the magnitude of the target object.
New Check Star - select a check star. Check stars are used to verify the quality of the measurement data. If something causes the measurement quality to degrade, the measurement of the check star will also vary on the graph.
You can untag an object by selecting it on the Object List and clicking Untag on the drop menu, or you can use the right-click menu in the Object List itself.
Once you have tagged all the objects needed, switch to the Graph Tab to perform the analysis.