Deconvolution processing is intiated via the Deconvolve tab. The Noise and Point-Spread Function models must be initialized before you can start deconvolution.
Since there are a number of settings required, and sometimes experimentation is required to determine the best results, a mechanism is provided to allow quick evaluation by operating on a subset of the image.
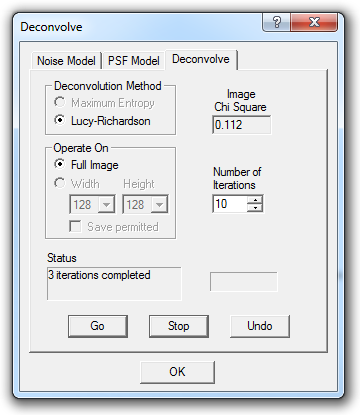
When the dialog is invoked, the Deconvolution Method radio buttons are enabled, allowing you to select between the Maximum Entropy and Lucy-Richardson methods. This setting can only be changed when the iteration count shown in the Status area is at zero. The Image Chi Square readout appears only in Lucy-Richardson mode and can be used to monitor convergence.
Because processing speed is much faster for small images, Operate On allows you to choose between processing the Full Image or a subset of specified Width and Height. The latter is intended for quick turnaround while experimenting with the Number of Iterations, or determining the best noise or PSF models. The dimensions of the subset rectangle are constrained to powers of two because the use of FFTs in the deconvolution algorithm makes them the most efficient sizes to process; they can only be changed using the drop-downs. You can select which part of the image you want to deconvolve by dragging the white framing rectangle that appears on the image when you specify a subset of Width and Height. Once deconvolution has begun, you cannot change the size of the processing rectangle; to change its size, first re-initialize by clicking Undo, whereupon Status will show the iteration count as zero.
To start deconvolving, enter the Number of Iterations to perform and click Go. The progress bar will start moving, and the Status display will report on the progress. If an image subset is being processed, the framing rectangle is redrawn in green to indicate it is no longer draggable; this is necessary since a given series of iterations must work on a consistent part of the image. Deconvolution is interruptible only at the end of each iteration. If you want to stop, click the Stop button and wait until the current iteration completes. Once stopped, you can reset to the initial conditions by clicking Undo, or resume the interrupted run by clicking Go again, perhaps after modifying the desired Number of Iterations.
Once you are satisfied with the results of a preliminary run, click Undo to return to the original image and reset the iteration count, which will allow you to change to Full Image mode. When only a subset of an image has been deconvolved, a Cancel button appears, warning you that closing the dialog will automatically restore the original image. If you really want an image of which only a part has been deconvolved, click the Save permitted checkbox to show the OK button in place of Cancel. Clicking this will terninate the deconvolution dialog while keeping the image exactly as shown. Such an image could be used as a source for the Clone Tool, allowing individual deconvolved stars to be copied back to a mostly original image.
When deconvolution is not iterating, you can also use Undo/Redo to toggle between views of the original and latest deconvolved images.
Color images can be deconvolved. The software automatically extracts and deconvolves the luminance image, recombining it with the color information when displaying intermediate and final results. If the results are not acceptable, you can use the Split Tricolor command to split the image into separate Red, Green, and Blue channels, deconvolve each separately, and then use the Combine Color command to reassemble the color image.
In Case of Convergence Problems
If your image will not converge, try the following:
Make sure the Background Level in the Set Noise command is just below the average background level in the image.
If you are using the Poisson noise model (recommended for most deep-sky images), make sure you have Photons per ADU set correctly.
If you are using the Uniform noise model, adjust the noise level to match the reading seen in the Information window’s "Dev" field when you point the cursor at a smooth area of the image.
Try adjusting your point-spread function; an inaccurate setting could cause convergence problems.
If you are using the Poisson noise model with the Maximum Entropy method, try switching to Uniform Noise model instead.
Try doubling the Uniform Noise Level incrementally, beginning with the value recommended by Auto-Extract. Retry deconvolution each time until the image converges. Do not increase the Uniform Noise Level beyond that required to obtain convergence – try to find the minimum setting that works.
Why is the Subset Better?
If you are finding that a subset image looks better than the final processed result, chances are that you have poor noise model settings. In many cases, smaller images can converge more easily than larger ones. Try adjusting your noise model settings.