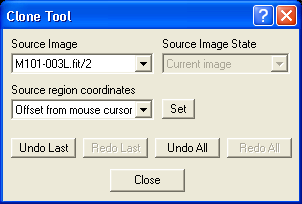
The Clone Tool lets you alter images by copying circular regions defined by the aperture of the mouse rings cursor from one location to another. You can do this either within an image or copy areas from different images. It can be used to eliminate localized defects such as satellite tracks by replacing them with sky background. Another important application is the removal of the "donuts" that can occur around bright stars embedded in nebulosity processed by the Deconvolution command . In this case the image is often esthetically more pleasing if the original region around these stars is restored.

As with most MaxIm DL commands, activate the image you want to modify before starting the Clone Tool. This image will be selected as the default Source Image from which regions are copied, but you can pick any other open image which has the same color type as the destination. In addition you can set the Source Image State to specify whether you want to copy from image in its present condition ("Current Image") or that prior to the most recently executed command that changed it ("Pre-Command Name"). The previous state is subject to both availability of the undo buffer and its color compatibility with the destination image.
Set the Source region coordinates dropdown to indicate the relation between the source and destination coordinates for the region to be cloned. "Same as destination" means that when you click on the destination image, pixels will be copied from the source image in the region at exactly the same X,Y location as the mouse cursor. (If the source image is smaller than the destination and the mouse coordinates would be off the source image, no action occurs.) You can copy continuously by dragging the mouse while holding down the left button. To avoid skipping regions, be careful not to drag the mouse too quickly.
The second Source region coordinates option, "Offset from mouse cursor", enables copying from one set of coordinates to a different one. After selecting this mode, the Set button is enabled and automatically pushed to remind you that you need to set a source location. (This also happens whenever you change to a different Source Image in this mode.) Click the mouse on the location in the source image that you want to copy from; an orange circle the size of the aperture is drawn there and the Set button pops up. Now change back to the destination image and click at the location that you want the data copied to. Once the spatial relationship between source and destination regions is established, the orange source region marker tracks mouse cursor movements in the destination window, showing you where regions will be copied from at all times. Drag the mouse to copy regions larger than a single aperture; as before. To change the relationship between source and destination regions, click the Set button again and pick a new starting point. Alternatively, right-click at the starting point and pick the command-specific Set source region item at the head of the context menu.
The third Source region coordinates option, "None (copy disabled)", prevents image cloning. It is provided in case you need to inspect image statistics in the Information Window, particularly when using Area mode which requires you to click and drag out the rectangle of interest.
Whichever cloning mode is in effect, the size of the region copied is that of the aperture (the innermost circle of the mouse cursor). You can change this in the usual way, that is, by right-clicking the mouse and picking an aperture adjustment from the context menu. The orange source region indicator is resized simultaneously, if shown.
Undo and Redo buttons are provided both for all copy operations and the last copy operation. Each mouse-click or drag on the destination image constitutes an operation. Clicks on all other images are ignored, except when setting the source point for offset mode.