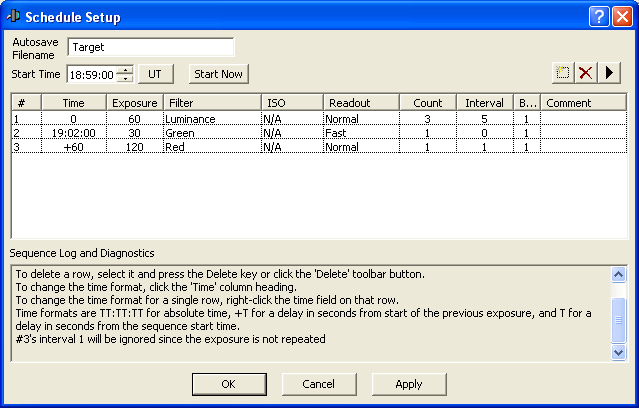
This section describes defining scheduled sequences. If Scheduled Mode is not active, please refer to the Expose Tab Autosave setup.
This is an alternative sequencing mode, which is especially useful for applications such as eclipse photography and laboratory imaging.
In this mode, you define a schedule on an exposure-by-exposure basis, with a designated start time for each individual exposure. You can enter the start time in UT or Local, as selected by clicking the UT/Local button.
To start a sequence, click the Start button on the main Expose tab. The exposures will not actually commence until the designated time; Start simply enables the sequence. If you wish to override the designated start time and start the sequence immediately, you can click the Start Now button.

The exposures themselves are entered into the large table. To make it easier to manipulate the table, the entire Scheduled Sequence window can be enlarged or shrunk, by clicking on the lower right corner with the mouse. This will resize the list to make it larger or smaller.
The columns of the list are:
# - Exposure number (not editable).
Time - time to start the exposure. Can be entered in several different formats, selectable using a left-click on the column title, or a right-click on the field to select the format on a line-by-line basis. See below for more information.
Exposure - exposure time in seconds.
Filter - Filter wheel selection, if wheel is present.
ISO - ISO speed setting for DSLR cameras only.
Readout - select the Readout Mode used for the exposure slot. The available values depend on the specific camera model being used.
Count - number of exposures to take for this slot; this allows you to specify an evenly spaced series of exposures with the exact same settings. This might be useful for photographing the partial phases of an eclipse, for example.
Interval - if Count is greater than 1, this is the interval between the exposures, specified from the start of the previous exposure.
Binning - selects the binning factor to use.
Comment - user-defined comment field; has no effect on the sequence.
To add a new row, click the ![]() new row button in the toolbar at upper right. You can edit fields in the row by double-clicking on them once with the mouse. Press Tab or Shift-Tab to go to the next or previous field; in edit boxes, you can use the up and down arrow keys to go to adjacent rows.
new row button in the toolbar at upper right. You can edit fields in the row by double-clicking on them once with the mouse. Press Tab or Shift-Tab to go to the next or previous field; in edit boxes, you can use the up and down arrow keys to go to adjacent rows.
The Time row can be set to three different formats:
A simple number, e.g. 100 - specifies that the next exposure will happen 100 seconds after the start of the sequence. Note that the first exposure does not have to occur at time 0.
A +/- number, e.g. +100 - specifies that the next exposure will happen 100 seconds after the start of the previous exposure. If you enter a negative number, the list will be automatically resorted to put the image in its correct place in the list.
An absolute time, e.g. 03:14:25 - specifies that the exposure will take place at a specific time. Note that the times are always relative to the start of the sequence; if you change the start time, all the absolute times will update to match.
To set the time format, left-click on the Time column title. You can also change the format of fields on a row-by-row basis by right-clicking on the individual row time value.
To delete an existing row, click the ![]() delete row button.
delete row button.
To select options, click the ![]() option button to bring up the menu.
option button to bring up the menu.
Set Image Save Path allows you to set the folder where the images will be saved.
Scheduled Mode allows you to switch back to the regular sequence mode by turning off the check mark.
Default Binning lets you set a default setting for the binning whenever you create a new entry in the table, for convenience.
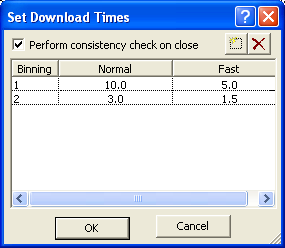
Set Download Times allows you to enter the time required for the camera to download in each of the supported modes. It is important to set this up for your particular camera, so that the sequence can be properly validated. Otherwise exposures may be skipped. See below for instructions on setting up the download times.
Warn if not started - if the user does not click the Start button in the Expose Tab before the sequence is due to start, a warning message will automatically be displayed. Warn if not started allows you to adjust the number of minutes in advance that the warning appears.
Validate Sequence checks to make sure that the sequence can be reliably executed. A typical error might be not allowing enough time for the previous image to download. Any errors are displayed in the Sequence Log and Diagnostics window.
Load Sequence allows you to load a sequence from disk. The sequence is output in a text comma separated value format, following the same table format as the list control. If you wish, you can edit the list in Notepad, Excel, or other editor; however, be careful to maintain the same layout or you will not be able to read the file back in.
Save Sequence and Save Sequence As allow you to save the current sequence to disk.
Clear Sequence will remove all rows from the current sequence.
Set Download Times allows you to record the time needed to download the camera image in the available readout modes. This is used when validating the sequence, and helps guarantee that all exposures scheduled will be successfully taken. You can add and delete rows in the list, in the same fashion as for the main sequence list control. For each row, you can set a Binning factor, and set download times for the available readout modes. Add a row for each Binning factor that you plan to use. Use a stopwatch or other means to measure the download time for the camera. You might want to enter a slightly conservative value, to ensure that there is no risk of unexpectedly losing exposures.

Perform consistency check on close will automatically validate the current sequence when you click OK. You will be warned if an exposure cannot be started at the designated time because the camera will still be busy with the previous exposure.