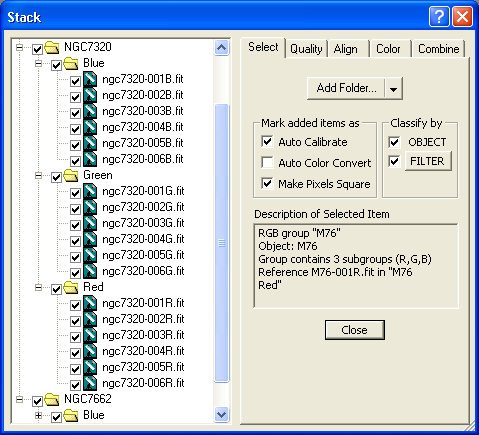
The first step is to select images. The Tree View on the left side of the dialog shows you what image groups you have selected, and you can expand the folders to see the individual images.
You can add images to the Tree View in a variety of ways:
Drag-and-Drop images and folders from the Windows Explorer
Use the Add button in a variety of ways (mode selectable via drop menu):
Add Images lets you add images that are open in MaxIm DL
Add Files lets you add one or more images from disk
Add Folder lets you add an entire folder, optionally including subfolders, from disk
Tip: Add Folder will automatically ignore calibration frames (as determined from FITS header). If for some reason you wish to manually stack calibration frames, use Add Files or drag-and-drop. Normally you do not need to manually stack your calibration frames, since the Set Calibration command can do this for you automatically.
The Classify by field automates the image selection process. When you turn on Classify by OBJECT, MaxIm DL will automatically inspect each image's FITS header for the OBJECT keyword. It will create a new group every time a FITS header indicates a new object name or, for images obtained using the Camera Control's Mosaic feature, the TILEXY key changes. This allows you to conveniently stack multiple different images in one operation.
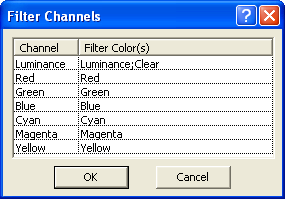
When you turn on Classify by FILTER, the FILTER keyword in the FITS header is inspected. This is used to sort the images into sub-groups corresponding to color channels. This allows you to build up RGB, LRGB, CMY, and LCMY image sets. Since there is no standard name for the filter slots, clicking the FILTER button brings up the Filter Channels dialog box, which allows you to assign filter names to a specific channel.

The Channel field indicates the pre-defined color channels that are recognized by the Stack command, namely Luminance, Red, Green, Blue, Cyan, Magenta, and Yellow. The Filter Color(s) field defines the equivalent filter name string in the FITS header. This is also the name of the filter that you specified in the filter wheel setup prior to imaging (see the Camera Control Window Setup Tab). You can have more than one filter name corresponding to a color channel; simply enter the names separated by semicolons (";").
The Stack command can also calibrate your images on-the-fly. To set this up to be the default, turn on the Mark added items as Auto Calibrate check box. If you forgot to turn this on (or off) before adding the files, simply right-click on the group folder and click Auto Calibrate.
Similarly, images from one-shot color cameras such as DSLRs can be converted to color (de-Bayer) automatically as they are used. Turn on the Mark added items as Auto Color Convert check box before adding images, or use the right-click menu for the group to toggle it on or off. Color Convert cannot be used at the same time as color combine. The settings used in the conversion process are those from the most recent use of the Convert Color dialog.
Normally Mark added items as Make Pixels Square should remain checked. It causes images with rectangular pixels to be vertically or horizontally resized by the appropriate factor to make the resulting pixel aspect ratio 1:1, which is necessary if alignment requires any rotation of the images. It has no effect on images with square pixels. To alter this option for existing groups, use the right-click menu.
Once you have added some images, the dialog box will show a series of folders, one for each image group. Expanding a folder shows its images (if it is a single color or one-shot color group), or a nested set of folders for its color filter subgroups. If any images or groups are in the wrong place, you can move them using drag-and-drop; certain restrictions apply as to where you can drop each kind of object. If you decide you do not want to use a particular image or group, select it and press Delete or simply turn off its check box in the list.
Whenever a single group or image is selected, its properties are shown in the Description of Selected Item. Group properties include group name, object, subgroups, reference image and, once a group has been combined, the name of the resulting image or file. Image properties include width and height, binning, file or image name, and exposure time.

Once you have added image groups, you can manipulate them by selecting images and/or groups and right-clicking. This will bring up a context menu which contains a subset of the following commands appropriate to the current selection:
Set Object Name – Allows you to set or modify the object name for a group. (If an image is selected, the command applies to its top-level containing group.) This is useful when no OBJECT key is present in the FITS headers of the input images. Changing the object name for a top-level group automatically updates its subgroups. [Keyboard equivalent: Ctrl+F2]
Rename Group – Allows you to set or modify the name of the selected group, or the top-level group containing the selected image. The group name is used as the basis for the name of the final combined image or file. By default, it is the same as the object name when one exists. [Keyboard equivalent: F2]
Set Group – Set the group type. Auto lets the Stack command determine the group type automatically. For color stacking you can select the standard RGB, LRGB, CMY, and LCMY types; a Two-color method is available as well. You can also select Individual Planes to co-align and combine the images for each filter separately but not combine them into a color image. Subgroups within color groups can be designated as L, R, G, B, C, M, or Y, corresponding to the various color channels. Single-channel groups are usually set as Mono groups.
New Group – Create a new empty group at the bottom of the tree. You can drag it into an existing color group, use Set Group to make it a color group itself, or add images to it in place. (To add content to a specific group, select it and uncheck both Classify by options, then select an Add command or drag-and-drop files onto the window.)
Auto Calibrate – Turn on or off calibration. This option applies at the group level, so changing it for an image affects all the images in the group. This command is greyed out if the selected objects or their subgroups have different settings; in this case, you can modify objects' settings individually.
Auto Color Convert – Turn on or off color conversion. The comments given for Auto Calibration apply to this command as well.
Auto Make Pixels Square – Turn on or off pixel aspect ratio normalization. The comments given for Auto Calibration apply to this command as well.
Auto Display – When checked, selecting an image displays it automatically. This option is implied when the Align Tab is active.
Display Image – Display the selected image.
Measure Quality – Measures the quality for the selected images or groups. This option not available when no quality criteria are defined, or the selected items have already been assessed. See Quality Tab for more information.
Reference Image – Every top-level group has a reference image to which all the other images are aligned. You can designate the reference image if you wish; if you do not, Stack uses an arbitrary one. Sibling subgroups share a single reference image; this means all images are co-aligned, regardless of filter.
Compute Alignment – See the description of this command on the Align Tab. Only available when an automatic alignment method is selected and at least one selected image is still unaligned, or a single aligned image is selected; in the latter case, the command name changes to Recompute Alignment as a reminder.
Compute and Align Image – See the description of this command on the Align Tab. Only available when at least one selected image has not been updated to register its image with the reference. If all selected images have already had their alignment parameters computed, the command name changes to Align Input Image to indicate that the computation part is unnecessary.
Reset Alignment – Discard the alignment parameters for the selected images and groups. Appears only when at least one selected image has had its alignment computed.
Reset Combine – Reset a group, allowing it to be recombined, perhaps after changing group membership, alignment, color or combine parameters. This does not affect the group's previous combine result, whether image or file; however closing a combine result image does also reset the group.
Sort By – Allows you to control the order in which images appear in their groups. The default is by Name, but you can order by any of the Quality Tab criteria, FWHM, Roundness, Intensity, and Contrast.
Select All – Select all the images and groups. You can also select multiple objects using the mouse and CTRL to pick individual items or SHIFT to pick a series of objects.
Check Item or Uncheck Item – Sets or clears the checkboxes beside the selected items. Only groups and images with check marks will be stacked. To change single items it is easier to simply click the checkbox.
Remove Item(s) – Remove selected images or groups from the stack. [Keyboard equivalent: Delete]
Remove Disabled Items – Remove all items that have been disabled (unchecked).
InfoTips – When checked, the Tree View displays a tooltip hint regarding its use.
The same context menus are available in all subsequent tabs.