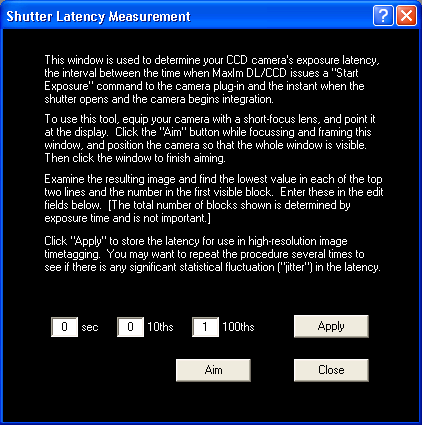
Clicking the Shutter Latency Measurement command on the Expose Tab's button menu displays the Shutter Latency Measurement tool. It is used to determine the intrinsic delay that occurs between the instant of issuing the command to start an exposure and the instant at which the shutter actually opens. This allows the DATE-OBS FITS keyword to be more accurately set for images obtained from the main camera. Although this delay can be significant (0.25 to 1 sec, depending on the particular camera system), in many cases it is quite uniform and repeatable.

The measurement procedure is described in the Shutter Latency Measurement window, which also serves as a dynamic test target. You should mount your CCD camera on a tripod, then fit it with a short focus lens so that you can image the full window as displayed on your computer's monitor. Therefore this test can be performed from the comfort of home.
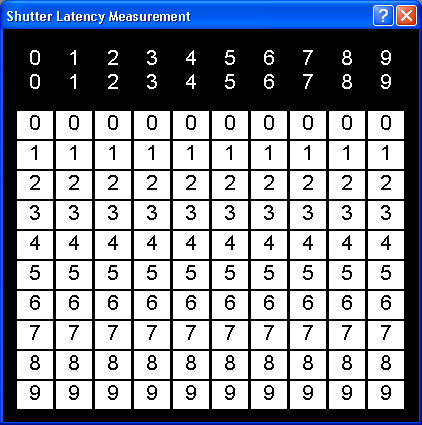
Click Aim to display the "checkerboard", a static version of the test target that you use to focus the camera and frame the image:

You will need to be able to see the entire window in your captured images, and distinguish the individual digits, or at least be able to reliably determine them from their relative positions. You should use as wide an aperture and as brief an exposure duration as possible during focusing. This is because during the actual measurement, each of the white blocks in the lower part of the target will be displayed for only 1/100th of a second, and it is important to be able to capture them. It is recommended that you reduce or extinguish room lighting if possible.
When you have focused the camera and framed the test target, click the mouse on the checkerboard to dismiss the static test target. Leaving the Shutter Latency Measurement window open, switch back to the Expose Tab of the CCD Control Window. Set the exposure to 0.5 sec or less and click Expose. The latency window will immediately show a dynamic display with a single white block, moving every 1/100th of a second to the next location in succession. One white digit in each of the top two rows is also illuminated at any given instant; this shows the time in seconds and tenths of seconds since the camera was commanded to take the exposure. The display continues updating as long as the camera is exposing.
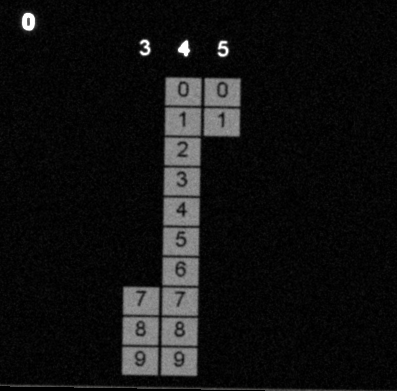
When the exposure has been downloaded, adjust the screen stretch to make the white blocks more visible if necessary and examine the image. You need to determine the time delay which occurred before the shutter opened. This is normally given by the leftmost digit in each of the top two rows (seconds and tenths), and the number of the top illuminated block in the first column that has any blocks lit; in the example below, the delay is 0.37 seconds. Note that if the delay is such that the shutter opened near the end of a second and the exposure ran into the next second, we want the first lit tenth and hundredth whose predecessors are not lit. Thus if both "00" (top left corner) and "99" (bottom right) are lit, the delay will be given by the first lit block in the right-hand grouping of contiguous lit blocks.

Enter the three digits of the measured delay in the sec, 10ths, and 100ths fields and click Apply. It is advisable to repeat the test several times to be sure that the results are sufficiently consistent to warrant time-tagging images to the nearest 100th of a second. Finally, it is necessary that the computer's clock be set accurately to Universal Time. Windows includes a time synchronization capability. There are also packages available to set the computer time by dialing up time services such as WWV. Satellite time receivers, including many GPS devices, are often available with computer interfaces for this purpose.
When shutter calibration has been successfully performed, MaxIm DL sets the DATE-OBS FITS keyword to one-hundredth of a second precision. If you wish to discontinue use of high-precision exposure time-tagging, set each field to blank and click Apply. In this case, DATE-OBS is recorded only to one-second accuracy. Images taken with the autoguider are always written to only one-second accuracy, and shutter calibration cannot be performed on the guiding camera.
When shutter calibration is complete, click Close so that MaxIm DL does not continuously generate the dynamic test target during all CCD exposures.