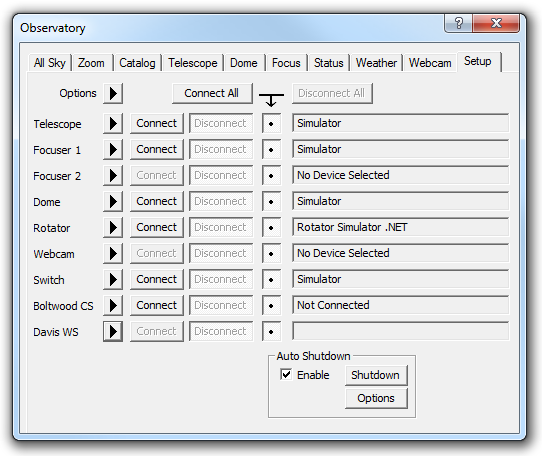
The Setup tab allows you to configure the telescope, dome, rotator, and focusers links.
Before you can use any Observatory equipment, you must first install the ASCOM Platform, plus any ASCOM drivers that you wish to use. The ASCOM Platform, and many drivers, are available at http://ascom-standards.org. Many equipment manufacturers supply their drivers directly, either with the equipment or via internet download from their web sites.
Global Options
The Observatory window is resizeable, by dragging on the frame using the mouse. If you make the window too narrow for the displayed tabs a pair of Scroll Buttons for the tabs will appear at top right. You can avoid having to scroll by either increasing the size of the window, or by turning off tabs you are not using.
The Options menu at top left controls global options for the Observatory window.
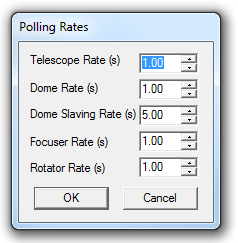
The first option is Set Polling Rates. This allows you to adjust how often each piece of equipment is queried for updated status. A faster update rate means that the user interface is updated more quickly; however going too fast may cause problems for some equipment.
The Options menu also allows you to control the display of each tab:
Show All Sky
Show Zoom
Show Catalog
Show Telescope
Show Dome
Show Focus
Show Status
Show Weather
Show Webcam
If for example you do not have weather and webcams,
At the top right there are Connect All and Disconnect All buttons. These buttons will allow you to connect and disconnect all equipment with a single click. If you do not wish a certain instrument to respond to this, turn off the Enable for Connect All item on the individual Options menu.
All Instruments
All of the instrument types have their own options menu, accessed using
their Options ![]() button. Most menus show Choose,
Setup, and Enable
for Connect All. Some have additional menu options, which will
be described below.
button. Most menus show Choose,
Setup, and Enable
for Connect All. Some have additional menu options, which will
be described below.
To choose the instrument to use, select Choose. This will bring up the ASCOM Chooser, which will allow you to select the hardware you wish to use.
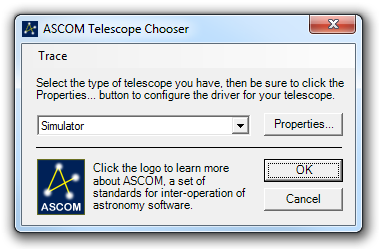
Select the telescope driver you wish to use from the drop list. If your instrument does not appear, consult the ASCOM web site or the manufacturer. The first time you choose an instrument you must click the Properties button, to configure the driver. Some drivers do not require configuration, but you still must click the button once. Once you have set up your instrument click OK. If you need to access the settings again later, you can use the Setup item on the Options menu.
All of the polling intervals are specified in seconds. The default is one second for all except for dome slaving, which has a default of five seconds. In most cases, the defaults are acceptable.
Some instruments may be slow to respond to polling traffic; in this case a high rate may cause MaxIm DL to become less responsive. In this case slowing down the polling will likely make the software work more smoothly.
If the instrument responds very quickly, a faster polling rate will provide more frequent updates to the screen.
Telescope
Most ASCOM drivers know the type of telescope mount and can report it. For these drivers set Mount Type in the Telescope Options menu to Automatic (from driver). However the commonly-used TheSky-Controlled Telescope used to control Paramount ME™ mounts and some others do not provide this information. In this case, Mount Type can be set manually to Equatorial, German Equatorial, or Alt-Az, as appropriate. If this is not done, MaxIm DL prompts for the mount type when connecting.
Some mounts/drivers may not support Park or Sidereal Tracking. If your mount does not support park but does support Sidereal Tracking on/off, then you can simulate parking. To set this up, select the Simulated Park item on the Options menu.
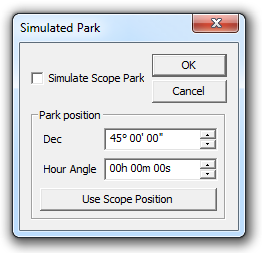
To activate simulated park, turn on the Simulate Scope Park check box. You can enter a Dec and Hour Angle for the park position, or just position the telescope in the desired position and click Use Scope Position.
Important: For German Equatorial mounts, the ASCOM driver may indicate which side of the pier the telescope is on. Unfortunately, some drivers do not report this correctly. For this reason the Telescope Options menu provides an additional item Side of Pier. When set to ASCOM Normal, the side of pier information is taken from the ASCOM driver as-is. When set to ASCOM Inverted, the sense of the pier flip is reversed. If you find that the Auto-Center function works backwards, then you should try this setting. From Scope Position overrides the ASCOM driver and derives the side of pier solely from the current telescope azimuth. If the ASCOM driver does not report side of pier information, then the information is also calculated from the azimuth. Although this calculation will work in the majority of telescope positions, some mounts can operate inverted and the calculation will be incorrect in that situation. It may be necessary under those conditions to set the pier flip controls manually.
Important: When using the Gemini telescope controller, make sure you have configured the hand paddle for JNow coordinates, instead of J2000.0 coordinates. Also make this same setting in the ASCOM driver setup dialog box.
Focusers
Focusers do not have additional options; however, there are some special considerations.
Focuser 1 should be physically mounted with Camera 1, and Focuser 2 (if used) should be physically mounted with Camera 2. Autofocus will assume this is the case.
ASCOM does not have built-in consideration for multiple focusers. As a result, it may not be possible to use two focusers that operate using the same driver. If the two focusers use different drivers (this usually means they are different brands of focusers) then there will be no conflict and both will operate.
Dome
The Dome Options menu has several additional items, Set Park Position, Find Home, Setup Sync, and Slaving Parameters. Some of these are also available on the Dome Tab.
Domes are usually parked at a specific azimuth when not in use. This may be necessary for orienting a solar cell, minimizing wind loads on the shutter, providing outside door access, or simply for cosmetic or convenience reasons. Set Park Position will set the park location to the current azimuth of the dome.
Many domes have a home sensor, which is needed to determine an absolute dome position (i.e. the position measurement encoder can only detect relative movement). In this case there is a homing function that slews the dome until the home sensor is located, and then the dome azimuth is synchronized to a known position. To start this homing function, select the Find Home item. This may require several minutes.
The home function must know the azimuth of the home sensor. Some domes configure this through their Setup dialog; if so, you should use their built-in sync feature. If the dome does not have a built-in Sync feature, then you can use the Setup Sync dialog.
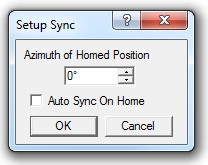
Enter the Azimuth of Homed Position, as determined by your dome installation. Turn on Auto Sync on Home to enable this feature. If this feature is provided directly by the driver, you should turn this option off to ensure that it does not conflict.
Rotator
The Rotator Options menu has two additional items. Check the Reverse option if the sense of rotation of your equipment is opposite to that of the FOV indicator on the Zoom Tab. To align the camera with the FOV's orientation, you can make small rotational adjustments until the horizontal axis of acquired images runs east-west, then select Set Current Pos as Zero. However an easier way is to solve an image, then use the Sync Rotator to Solved Image command on the Zoom tab.
Webcam
You can set up a webcam to display on the Webcam tab. To do this, click the Options menu, click Choose Camera, and select the camera from the list of available DirectShow video sources.
Switch
You can choose an ASCOM Switch device using the Options menu. When configured, the switches are available through the Webcam tab.
Boltwood Cloud Sensor
If the Boltwood Cloud Sensor Clarity II software is installed, you can connect to it. All information is displayed on the Weather tab, data is added automatically to camera image FITS headers, and you can also configure Auto Shutdown (see below).
Davis WS
If a Davis Weather Station is installed, you can connect and retrieve information for the Weather tab. Data is also added automatically to camera image FITS headers.
Auto Shutdown
Before you can use the automatic shutdown function, you must first configure it. Click the Options button under Auto Shutdown.
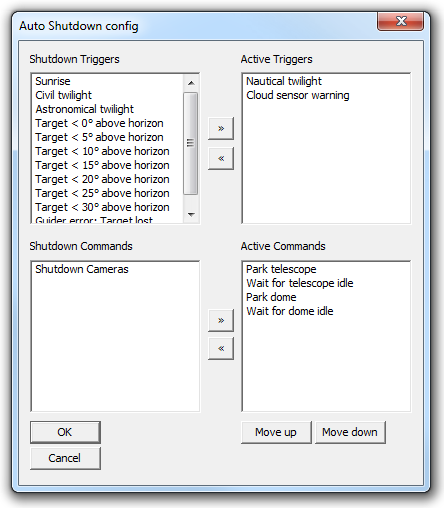
You can configure different events that cause the shutdown sequence to occur. These include:
Sunrise - trigger when sun rises
Civil twilight - trigger when the sun reaches 6 degrees below the horizon
Nautical twilight - trigger when the sun reaches 12 degrees below the horizon
Astronomical twilight - trigger when the sun reaches 18 degrees below the horizon
Cloud sensor warning - trigger when the Boltwood Cloud Sensor reports unsafe conditions (very cloudy, rain, etc.)
Target < N degrees above horizon - trigger when the object (telescope position) goes below N degrees
Guider error: Target lost - trigger when the autoguider loses lock
The shutdown options include parking the telescope and dome, and shutting down the camera coolers. The option to wait for telescope and dome park to complete allows you to sequence these operations instead of doing them simultaneously.
To turn on the automatic shutdown function, check the Enable button under Auto Shutdown.
To force an immediate shutdown click the Shutdown button.