This plug-in driver is available as part of the Obsolete Driver Pack.
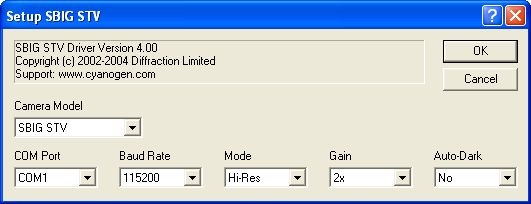
For this driver, please select SBIG STV on the Setup tab.
The SBIG STV connects via serial interface. The correct COM Port must be selected, and the Baud Rate must match the setting accessed using the front panel on the STV.
When used as an imaging camera, two Mode settings are available. Hi-Res produces a 320x200 image with 7.4 micron pixels. Hardware 2x2 binning is also available, which produces a 160x100 image with 14.8 micron pixels.
In Lo-Res mode, the STV produces a 320x200 image with 14.8 micron pixels. Software 2x2 binning is also available, which produces a 160x100 image with 29.6 micron pixels.
Gain allows you to control the gain level used in the STV.
Turning on Auto-Dark tells the STV to automatically take its own dark frames as needed. The dark frames are not actually downloaded to the PC. Note that this requires double the normal exposure time when a new dark frame is needed, although subsequent images with the same settings will automatically re-use the dark frame. Attempts to use the normal auto-dark functions in MaxIm will be ignored, and any dark frames taken manually will be all zero.
The STV can be used as a guider via the Guide tab, but the internal relays are not available in this mode. You must select another method using the Control Via setting in the Guide tab Settings.
A special guiding mode is available for the STV. Set the Mode to either Hi-Res Guider or Lo-Res Guider (note: Hi-Res and Lo-Res affect only the imaging mode of the camera as described above, not the guiding). When this mode is selected, a special STV Guider Control panel appears. (The panel initially appears over the Camera Control window but can be moved to a convenient position on the screen).
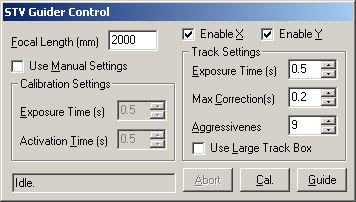
The STV Guider Control allows you to command the STV to autoguide using its built-in algorithms. When the STV is not actively guiding, you can also take images normally.
The Focal Length (mm) of the instrument used must be entered; this is required by the STV's built-in guiding algorithms. You can enable or disable the two axes using Enable X and Enable Y.
The STV must be calibrated prior to guiding. To calibrate, it takes a series of images in slightly different telescope positions. Normally the STV automatically determines the exposure and relay activation times during calibration. If you wish to force manual settings, turn on Use Manual Settings and enter the desired Exposure Time (s) used during calibration, and the Activation Time (s), which determines how long the relays are activated during calibration moves.
The Track Settings allow you to select the Exposure Time (s) during guiding. You can set Max Correction (s) to limit the maximum relay activation time for a single correction. The Aggressiveness setting adjusts the "loop gain". Back off this setting if the guider over-corrects; increase it if the response time is too slow (in most cases a setting of 8 or 9 is recommended). Use Large Track Box allows you to select a larger track box size, which is useful if the star image is especially large, but may produce slightly slower guide rates.
To start a calibration cycle click Cal. The progress of the calibration will be displayed in the status box to the left.
To start guiding, click the Guide button. The guider offset will be displayed in the status box during guiding.
If you need to stop guiding, or need to abort the calibration cycle, click Abort.
Availability of this feature depends on Product Level.