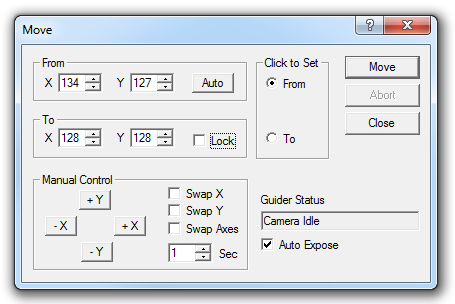
The Move command is activated by clicking the Move button on the Guide tab. It allows you to reposition the telescope using the autoguider output relays. Since this is done at guiding speed, only small movements are possible. For slewing large distances, and for Auto Center operations, use the Observatory Control window.

There are two methods for moving the telescope. The first is to designate a From and To position and click the Move button. Note that the accuracy of this movement depends on the accuracy of the autoguider calibration and the mechanical characteristics of the telescope mount.
The positions may be entered manually, or by clicking on an image from the autoguider using the mouse. The Click to Set selector determines which field the data is entered into when the mouse is clicked. The Auto button allows you to automatically select the brightest star in the image as the object to be moved. The Lock button allows you to lock the To field so it cannot be accidentally changed. This is useful if the star must be positioned accurately; for example, when aligning it with a spectrograph slit. If you reactivate the Camera Control Window without closing the Move dialog, the source or destination fields that would otherwise be set by a mouse click on the image are grayed out to indicate that Move is no longer active. To reactivate them, simply click anywhere on the Move window.
The manual controls allow you to activate one of the output relays for a time determined by the Sec field. Clicking one of the buttons moves the mount in the desired direction. The buttons may be reassigned using the Swap X (reverses X buttons), Swap Y (reverses Y buttons) and Swap Axes controls (switches X and Y buttons).
If the Auto Expose control is on, the autoguider will automatically take an exposure after every move operation. Alternatively, you can take an exposure using the Camera Control window's Guide, Focus, Inspect, or Expose tabs.
The Guider Status field shows the current autoguider activity. You cannot start a move if the mount is already slewing, the guider camera is busy, or when tracking or autoguider calibration is in progress.
The Abort button stops the current slew or guide camera exposure, and will also cancel tracking or calibration if active. The Close button closes the dialog and also aborts any slew in progress initiated from this command (i.e., by From/To or manual controls).