![]() If you have not already done so, open the DG_HaleBopp.fits file in the Samples directory. (For help on opening files see the Open a File Tutorial).
If you have not already done so, open the DG_HaleBopp.fits file in the Samples directory. (For help on opening files see the Open a File Tutorial).
![]() Click the Undo button on the toolbar to remove the stretch from the previous tutorial.
Click the Undo button on the toolbar to remove the stretch from the previous tutorial.
Right-click on the image and select Screen Stretch > Max Val from the context menu. Almost everything except one bright star and the core of the comet dim substantially or disappear altogether.
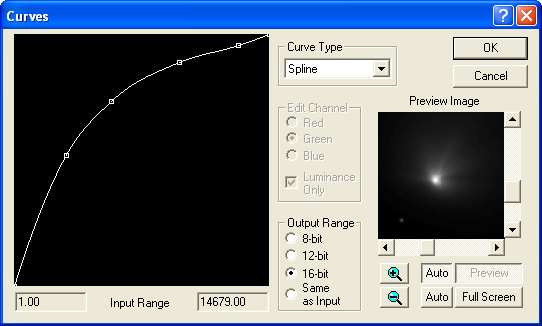
![]() Select the Curves command on the Process menu. If the graph in the left half of the dialog does not show a straight line from the lower left to the upper right corner, right-click in the graph area and select Curve > Reset from the context menu. Set the Curve Type to Modified Spline.
Select the Curves command on the Process menu. If the graph in the left half of the dialog does not show a straight line from the lower left to the upper right corner, right-click in the graph area and select Curve > Reset from the context menu. Set the Curve Type to Modified Spline.
The graph controls how the image is stretched. The brightness of pixels in the original image run along the bottom. The corresponding brightness of pixels in the processed image run up the graph.
A straight line will have no effect on the image. If you raise the curve in the middle, pixels in the middle brightness range of the image will be boosted. You can fine-tune different parts of the image by adjusting different parts of the graph.
To adjust the curve, click to create a new point. The line will adjust to pass through that point. You can drag the point in any direction using the mouse. To remove a point, right-click and select Delete Point.
Now set the Output Range to 16-bit and click the Auto to the left of the Full Screen button. The image will show a little more detail but still be mostly dark. That's all right, since we can repeat the process iteratively. Click OK, then reactivate the Curves dialog and apply the curve again. Repeat several times until the tail is visible over a significant portion of the image; the inner near-saturation region of the coma remains small.