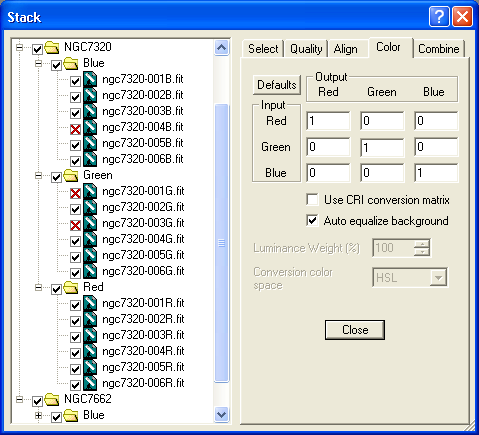
The Color Tab is only used when you are processing multiple filter images into a color composite. For one-shot color images such as those from DSLRs, you should use the Auto Color Convert feature on the Select Tab. The controls on this tab are enabled only when a color group is selected in the tree control.
Stack handles several different kinds of color image composites, including:
RGB – the simplest method. Images are taken through red, green, and blue filters. The arrays are aligned and simply copied into the red, green, and blue planes of an image buffer.
LRGB – an improved RGB combine method. An unfiltered Luminance frame is added to the mix. This has several advantages. The sensitivity of the Luminance frames is greater since color filters inherently block light. The human eye is less sensitive to color changes than to luminance changes, so the color frames can be taken at lower resolution (binned) for higher sensitivity. This allows you to take the bulk of the frames as Luminance, resulting in better signal-to-noise ratio in a shorter period of time. The one disadvantage is that color rendition may not be quite as good as straight RGB; however, the difference is usually minimal.
CMY – an alternative to RGB using negative color filters. This has been promoted as better than RGB because each color filter allows more light through. Unfortunately, the process of mapping the color to an RGB-based computer image negates much of the already modest minor signal-to-noise advantage. CMY images are often harder to color balance properly.
LCMY – similar to LRGB except with CMY filters.
Two-color – in many cases, a decent color image can be created by combining just two colors, assigned to the Red and Green channels. Also useful for false-color representations.
Note that although an Individual Planes group contains subgroups from multiple channels, it does not generate a merged color result and does not enable controls on the Color Tab.
The color balance can be adjusted using the color matrix. The Input rows are multiplied by the value in the matrix and transferred into the Output color planes at the top. For simple RGB stacking, all values are zero except for Red-to-Red, Green-to-Green, and Blue-to-Blue.
If the filters are not ideally matched to human color vision, additional adjustments can be made by adding positive or negative values in the other slots. For example, the CRI Micro*Color LCD tunable filter (commonly used in laboratory imaging applications) has significant overlap between the color bands; by turning on the Use CRI conversion matrix check box, the color matrix is loaded with finely-tuned values suitable for that device.
The Defaults button will load simple 1:1:1 balance settings, or the equivalent subtractive values for CMY imaging. For recommendations on determining the correct color balance ratios, please see the Color Balance section in the Imaging with MaxIm DL chapter.
The Auto equalize background check box attempts to neutralize the color background of the image. This is done to remove the effects of sky glow, light pollution, or changing conditions during capture of the different filter bands. This is quite accurate as long as the image has significant background area, as opposed to being completely filled with nebulosity. Additional tweaking can be done using the Color Balance command after the stack is complete.

If a Luminance filter is used, you can adjust the Luminance Weight (%). 100% means that the luminance information in the RGB filters is completely replaced with the Luminance frame data. Also you can select the Conversion color space, as follows:
CIE L*a*b – also known as CIELAB. The image is first RGB combined, then converted to the L*a*b color space, which has a Luminance plane. The Luminance image is substituted and the color space is converted back to RGB.
RGB – the output image is produced by calculating the RGB ratio at each pixel, then scaling by the Luminance frame.
HSL – also known as Hue-Saturation-Lightness. The image is first RGB combined, then converted to the HSL color space, which has a Luminance plane. The Luminance image is substituted and the color space is converted back to RGB. The HSL algorithm is courtesy John Winfield.
The choice of which method to use is a matter of personal preference. Some images may work better with one method than another.