Autoguiding appears at first to be a rather complex task. However, the autoguider controls in MaxIm DL are actually quite easy to operate.
For most camera models, you must have a separate autoguider camera for this purpose (usually selected as Camera 2).
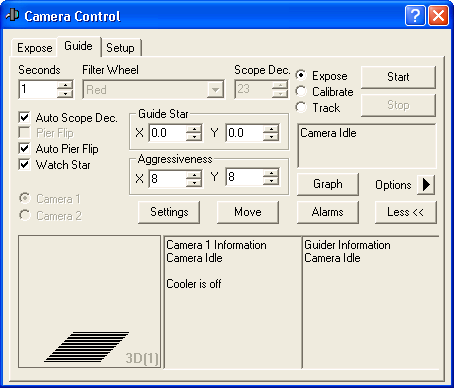
Switch to the Guide tab.

If you have a telescope connected to the Observatory Control Window then turn on Auto Scope Dec and Auto Pier Flip. If these are enabled, you will not have to recalibrate the autoguider after moving the telescope. If you do not have a telescope connected, you can control Scope Dec and Pier Flip manually. If you plan to recalibrate for each target, leave Scope Dec at 0.
Turn on the Watch Star check box. This will display the guide star continuously during guiding.
If your guider has a shutter, click the Options button and select Simple Auto-dark. This will automatically create a dark frame and then dark subtract each image from the camera. If you do not have a shutter select No Calibration for now.
Set the exposure time to 0.5 Seconds.
Click the Settings button.

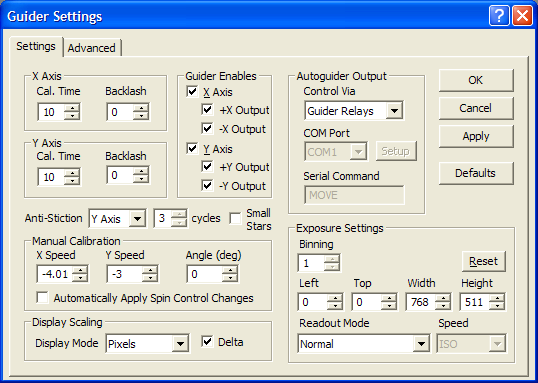
Click the Defaults button and click Yes to confirm that you want to set all fields to their recommended initial values. (The Manual Calibration and Exposure Settings controls are excluded.) Among these are:
The Cal Time controls specify how long MaxIm DL will "hold the button down" (i.e., actuate the telescope guiding motors) during guider calibration. This will determine how far the star moves between calibration steps. Calibration is an essential step to determine how fast the guiding motors move the telescope and thus how much correction to apply for a particular measured position error. (Note: if there is a speed control on your mount, it is recommended to set it between 0.5X and 0.1X for guiding purposes.) Cal Time is measured in seconds and can be specified independently for each axis.
The six check boxes in the Guider Enables group are all turned on, enabling guiding in each axis, and enabling guiding motor operation in each direction.
Control Via is set to Guider Relays. This setting informs MaxIm DL how the guiding motors (or in this case simulator) are controlled. If you are using a different device to send commands to the mount, you will need to configure this differently. Please refer to the Guide Tab section for more information.
Set Display Mode to Pixels. Also turn on the Delta check box. This causes the guider position to be reported in pixels, or fractions of pixels, and displayed as an offset from the correct position.
In most cases, you can set Binning to 2 or 3. Binning 1 is only required when you are using a separate guide scope that is a much shorter focal length than the main scope. The guide camera can have 1/10th the resolution of the main camera and still guide very well, since the software can measure the centroid of a star to a tiny fraction of a pixel.
Click the Reset button to reset the subframe settings to include the entire guide sensor.
Select the Advanced tab of the Guider Settings dialog, click its Defaults button and confirm that you want to set all fields to their recommended initial values. If a filename appears under Offset Tracking, click Clear.
Click OK to return to the Guide tab. Once you have these settings configured the way you want them, they will be remembered the next time you start the software.
![]()
On the Guide Tab, make sure the Expose mode is selected and click Start. A single image will be displayed.
The brightest star will automatically be selected as the guide star. You can optionally pick the guide star by clicking on a star in the image. Do not draw a box around it. Just click on it.
Now switch the mode to Calibrate, and click the Start button again. The camera will take a series of pictures; each time moving the telescope mount (if you are using the simulator, the "mount" and "stars" are of course simulated).
The calibration cycle will take five pictures, moving the star in +X, -X, +Y and -Y directions. Usually X refers to RA and Y to Declination, but depending on the mount wiring this may be different. The star may also move in a different direction, because the camera may not be aligned with North at the top. (The camera simulator has a setting that allows you to adjust how the camera is "rotated".)
Once the calibration cycle is complete, the star should be approximately back where it started. A red line is drawn to trace the path of the star; this should look like an "L". The sides of the "L" need to be long enough to get a good measurement of the star movement. If the movement is too short (less than 20 pixels or so), increase the appropriate Cal Time setting and start the calibration cycle again.
We are now ready to guide. Switch the guider mode to Track. Set the X and Y Aggressiveness settings to 8. Click Start.
The image will shrink to a small subframe. This is done to speed up camera download during guiding. You may wish to zoom in the window to see it better. The star should be in the center, and should remain there during tracking. (If the simulator was set up to emulate guider errors, you will see the star bounce around a bit because the simulated "mount" has very rough tracking. Hopefully in the real world your tracking will be smoother!)
You can now switch to the Expose tab and start an exposure. By default, a five second pause is inserted before each exposure, to make sure that the guider is tracked in before the next exposure starts. Guiding is not performed during main camera readout (to prevent readout artifacts due to CPU loading, and because some cameras use one shutter for both sensors); if the telescope drifts during readout the delay allows it to be tracked in.
Some guiding tips:
If the guider needs more settling time between exposures, go to the Autosave Setup and increase the Delay Between to more than 5 seconds. Alternatively, you can set up a Guider Settling Criterion on the Guide Tab's Options menu.
The calibration settings change if you move the telescope in declination. To avoid having to recalibrate for every image, you can use declination compensation. Set the Declination field to the declination of your calibration star before you calibrate. Then reset the Declination value whenever you change guide stars. You can use Auto Scope Dec to retrieve this information from the Observatory Control Window.
If you are using a German Equatorial mount, pier flipping will also affect the guider calibration. The Auto Pier Flip will retrieve the necessary information from the Observatory Control Window.
If you have a large amount of backlash in your mount, you might want to adjust the Backlash settings. Be careful not to set them too high, or it will make things worse instead of better.
If you have stiction on the declination axis of your telescope, you may wish to avoid reversing the corrections in declination. To do this, note the direction of drift and in the Settings turn off the autoguider output that pushes in the direction of the drift. That will prevent the declination axis from ever reversing direction.
It is usually best to balance the telescope slightly heavier on the East side, so the main drive gear is lifting the scope. Otherwise any slop in the gears will result in them bouncing back and forth between the teeth, which makes proper guiding impossible. If this is very bad you may need to adjust the gears.
If you have trouble getting good results, please refer to the Autoguider Troubleshooting section.
For full details on the Guide tab please see Guide Tab.