ACP Planner is a free tool which can generate both ACP observing plans as well as RTML for Scheduler input. For details on using Planner, see its own built-in help.
![]() If you are an astro-imager, it is strongly suggested that you not try to use Planner for your observing requests. The web browser interface to Scheduler has a form Submit Astro-Imaging Request that is much easier to use and will result in optimum usage of Scheduler's capabilities for astro-imaging.
If you are an astro-imager, it is strongly suggested that you not try to use Planner for your observing requests. The web browser interface to Scheduler has a form Submit Astro-Imaging Request that is much easier to use and will result in optimum usage of Scheduler's capabilities for astro-imaging.
Since Scheduler picks the times to do observations, Planner's timing features are irrelevant. It's easiest to simply disable Planner's timing features (in its Preferences) when using it to make observing requests for Scheduler input:
![]()
![]() The terminology here can be confusing. In the context of Scheduler a "Plan" is the minimum schedulable unit. In the context of Planner, a "plan" is the output of Planner, containing requests for all of the targets in the list. If you have trouble following the info here, and if you are an astro-imager, once again please consider using the web browser Submit Astro-Imaging Request form!
The terminology here can be confusing. In the context of Scheduler a "Plan" is the minimum schedulable unit. In the context of Planner, a "plan" is the output of Planner, containing requests for all of the targets in the list. If you have trouble following the info here, and if you are an astro-imager, once again please consider using the web browser Submit Astro-Imaging Request form!
Normally, each target in Planner's list is exported as a separate RTML request, which translates to a separate Scheduler Plan. See RTML Mapping. As you'll see, it is possible to force Planner to generate RTML in which all targets are lumped into a single Plan, but unless you really need it, this is not recommended.
![]() To make the best use of Scheduler, divide your observing requests into as many targets as possible, which will result in as many Plans as possible. The idea is to keep each Plan as small (in time) as possible. This gives Scheduler the most latitude in scheduling observations. In any case, try to limit the time duration of a target/Plan to one hour or so. This may require you to create several targets in Planner's list for the same actual sky target, each with a different set of images.
To make the best use of Scheduler, divide your observing requests into as many targets as possible, which will result in as many Plans as possible. The idea is to keep each Plan as small (in time) as possible. This gives Scheduler the most latitude in scheduling observations. In any case, try to limit the time duration of a target/Plan to one hour or so. This may require you to create several targets in Planner's list for the same actual sky target, each with a different set of images.
For example, suppose you are an astro-imager and you want to acquire 4 hours of Luminance with 30 minute individual exposures, plus 6 hours of H Alpha with 45 minute individual exposures. In keeping with the above recommendations, you would need to create 10 separate targets in Planner's list, all for the same sky object(!), 2 for Luminance and 8 for H-Alpha. You'll have to give them different names (e.g., M51-L1, M51-L2, M51-HA1, M51-HA2, M51-HA3, M51-HA4, M51-HA5, M51-HA6, M51-HA7, and M51-HA8. Add two 30 minute Luminance images to the two targets for Luminance (total, 2 hours) and one 45 minute HAlpha image to each of the 8 H Alpha targets (6 hours total). This keeps the individual Plans at or below about one hour in duration.
See what I mean? If you are an astro-imager, you really should be using the web form! It does all of this grunt work for you!
Planner supports several constraints when exporting RTML. When adding or editing a target in Planner, the Add/Edit Target window (accessible by right clicking in the target list) has an input for the minimum altitude above the horizon:
![]()
This will cause the Horizon constraint to be set for that target's observations. In addition, after adding all of the targets and images, when you export the Planner list to RTML, an Export form appears where you can add a Moon Avoidance Lorentzian as well as Sky Condition. These apply to all of the targets (requests, which become Plans). See the next section for details on exporting.
Once you have entered your targets and their images, as usual, select Save Plan As... in the File menu. In the File Save window, select files of type RTML:
![]()
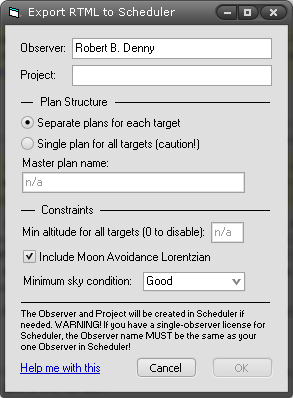
After specifying the file name and clicking OK, you'll see the Export RTML to Scheduler window:

Here is where you can indicate the name of the Observer and Project to which the request will be assigned, the Moon Avoidance and sky condition constraints to be applied to all of the images in all of the targets (scheduler Plans). The hyperlink at the bottom leads to more specific help which won't be repeated here.