Importing RTML
Importing ACP observing plans
Importing and exporting scheduler objects
Importing and exporting the schedule database
Using the Scheduler Browser to input request data can be time-consuming. The primary methods of loading externally generated request data into the database is Remote Telescope Markup Language (RTML), a type of XML document. RTML can be produced by ACP Planner or via a script or program. RTML 2.3 supports all of Scheduler's constraints and timing features.
Another way to get request data into Scheduler is by importing an ACP Observing Plan. If you have lots of extensive ACP plans and are migrating to Scheduler, you can import these and preserve most of the features. With scheduler in charge of timing, the timing directives in the ACP Plan are ignored. But most other target specs and directives are honored during the import.
In addition, you may want to save request data in external files and load them back in at a later time. For this, Scheduler supports exporting and importing of Projects, Plans, Observations and ImageSets, or even the entire database.
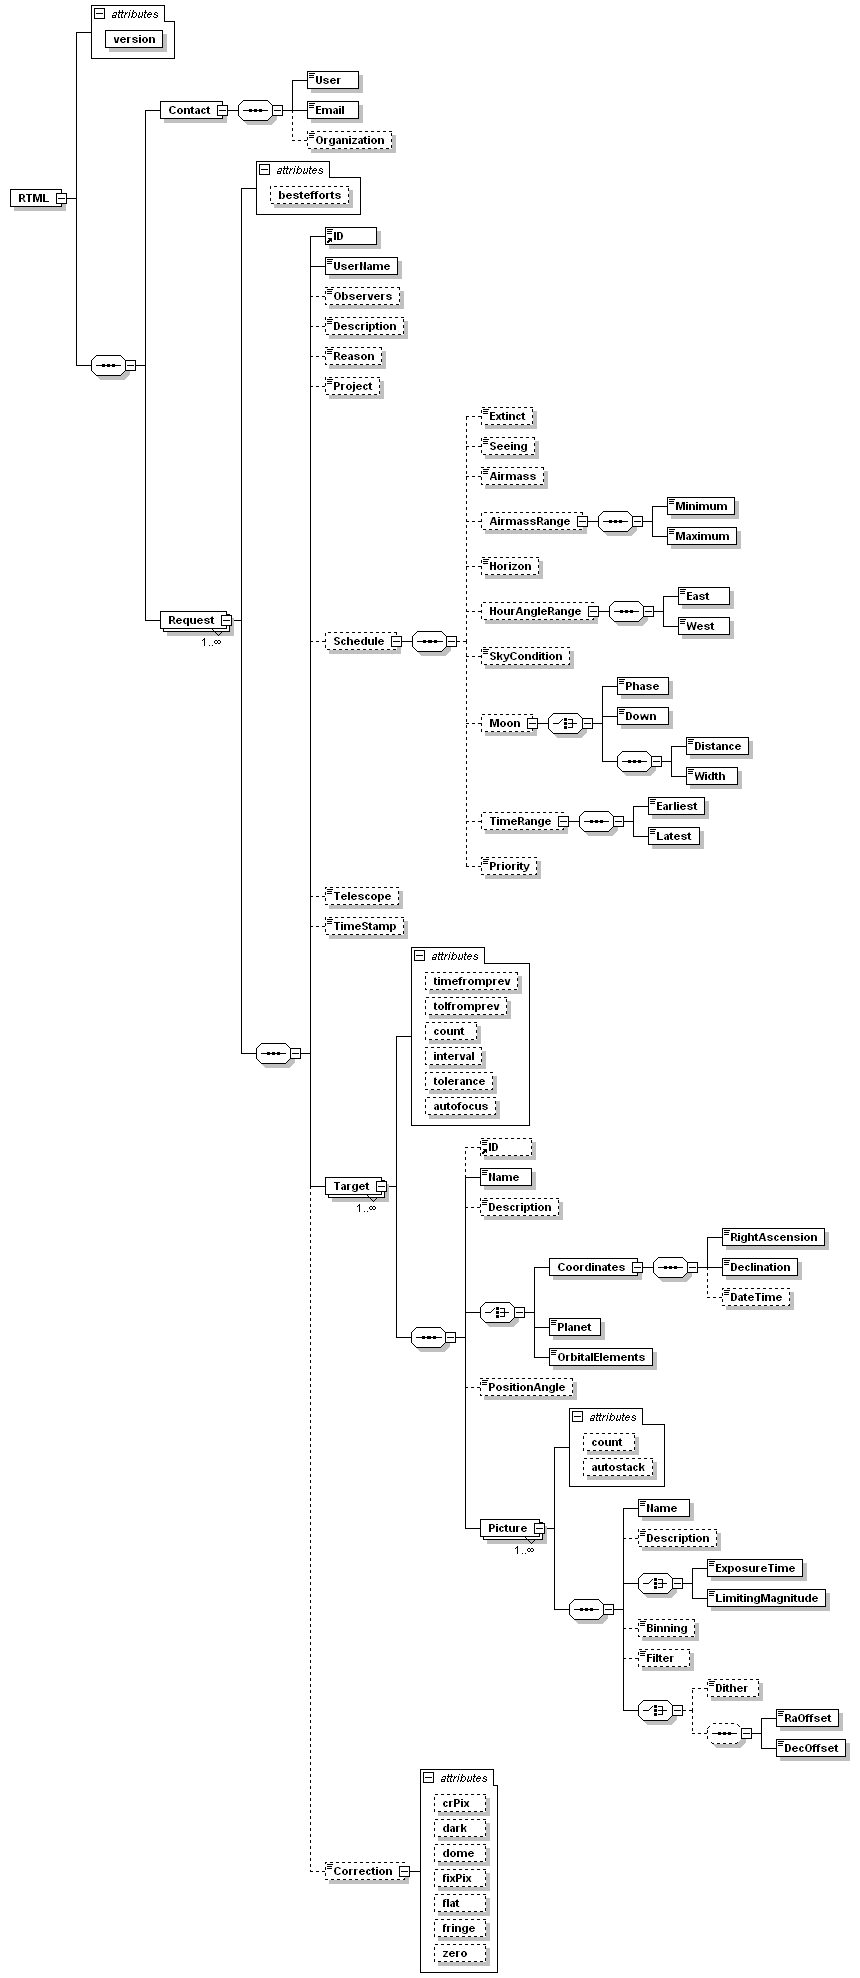
Remote Telescope Markup Language (RTML) is a standard observing request data format based on Extensible Markup Language (XML). The current public version of RTML is 2.1, but does not provide access to all of Scheduler' features. Scheduler supports an extended version, RTML 2.3. Here is a diagram of the RTML 2.3 schema.
To import an RTML document, loading all of its request data into the database, select the Import RTML menu item on the desktop browser's Data menu, or the hyperlink on its splash panel, then select the RTML file. You will see the newly added request data in the browser. You can also upload RTML via the web interface of Scheduler.
![]() How RTML Maps to Scheduler Requests
How RTML Maps to Scheduler Requests
Scheduler includes a scriptable component that can be used to greatly simplify the creation of RTML 2.3 import documents. A complete Programmer's Reference for this component is included and is accessible from the Scheduler Start menu. Also see Planner Scripts and the scripts in the Planner Scripts folder for examples of how to generate RTML from any Windows Script language (e.g. JScript, Perl, Python, VBScript), Visual Basic 6, any .NET language, etc.
It is also possible to use a script to import an RTML document into the Scheduler database, as opposed to importing with the Schedule Browser. Either of the following simple scripts will import a file:
// JavaScript (JScript)
var DB = new ActiveXObject("DC3.Scheduler.Database");
DB.Connect();
var I = new ActiveXObject("DC3.RTML23.Importer");
I.DB = DB;
I.Import("C:\\xxx\\yyy.rtml");
DB.Disconnect();
' VBScript
Dim I, DB
Set DB = CreateObject("DC3.Scheduler.Database")
Call DB.Connect()
Set I = CreateObject("DC3.RTML23.Importer")
Set I.DB = DB
I.Import "C:\xxx\yyy.rtml"
Call DB.Disconnect()
where C:\xxx\yyy.rtml is the path to your RTML document. Use your imagination - an ACP observing plugin (TargetComplete, etc.) could generate a new observing request.
Importing ACP Plans is a two-phase process. You first compile the plan and review the results, then if you are satisfied, you import the plan into the Scheduler's database. To import an ACP observing plan, loading its request data into the database, select the Import ACP Plan menu item on the browser's Data menu, or the hyperlink on the splash panel. You'll see a new window appear, containing brief instructions and controls. Click the Compile... button then review the results in the console area. Look at the things that will be ignored, as well as any compilation errors that may have been reported.
If the plan compiled successfully, the Import... button will activate. If you are satisfied with the compilation info in the console area, select the Scheduler Observer or User that will own the resulting project then click the Import... Button. Shortly thereafter you'll see your new project and plans. See below for the special POSS Mode.
The requests in the ACP observing plan are entered into a new scheduler Project whose name is initially the same as the file name of the imported ACP plan. Each target in the ACP plan becomes a separate Plan in the scheduler. So if your ACP plan has 5 targets, your new scheduler Project will have 5 Plans. Remember that Plans are the minimum schedulable unit, so each of your ACP targets will be run independently of the others. Each scheduler Plan is assigned a single Observation containing the target coordinates and constraints. The images specified for that target are entered in one or more scheduler Image sets. The POSS Import mode is different, and is described below.
Most ACP Plan features are supported. Those that are not (timing directives and the #sets directive) will be noted in the console after compiling successfully.
Constraints and attributes applied to Observations resulting from importing an ACP observing plan are applied by adding special statements to the ACP plan before importing. The specifications are in the form of comments (lines starting with a semicolon) in the ACP plan, so they will be ignored by the ACP plan compiler. After the plan is compiled by the ACP compiler, a second phase of compilation is performed looking for these constraint statements, checking them, and applying them to the resulting Scheduler Plans (attributes) and Observations (for constraints and attributes).
The general format of a constraint or attribute spec is a semicolon, one or more spaces, "ACPX" or "ACPS", optional spaces, the name, optional spaces, an equal sign, optional spaces, and the value(s). To cancel a constraint or attribute for the succeeding targets, specify "none" for its value. Here are some examples:
; ACPX Horizon = 40
;ACPX moonavoid=120,14
; ACPS HoUrAnGlE = -3.5 , 4.0
;   ACPX Horizon  = none
; ACPS Priority = 10
You can see that the capitalization of the constraint names is not important, nor is the presence of spaces (or not). The ACPX or ACPS must be all caps.
Once a constraint/attribute statement is encountered in the ACP plan, it remains in effect for all of the ACP targets thereafter, unless cancelled by another statement with a value of "none".
You can specify all of the standard constraints that are supported by ACP Scheduler, plus Priority as a Plan attribute (more may be added in the future). Custom constraints added by customers using the Constraint SDK are not supported. Here is a table with the syntax:
| Syntax | Meaning |
|---|---|
| Horizon = nn | Minimum elevation, degrees |
| HourAngle = mm,nn | Hour angle range: east hours, west hours |
| MoonDown = true | Moon must be down |
| MoonAvoid = mmm, nn | Moon Avoidance Lorentzian: distance, width |
| AirMass = n.nn | Airmass equal or less than n.nn |
| AirmassRange = m.mm, n.nn | Airmass between m.mm (high) and n.nn (low) |
| SkyCondition = value | Sky condition value or better (Excellent, Good, Fair, Poor) |
| TimeRange = m.mmmmmm, n.nnnnnn | Time must be between JD m.mmmmmm (early) and n.nnnnnn (late) |
| Priority = nn | An integer with an arbitrary range specifying the Priority for generated Plans |
In support of the Puckett Observatory Supernova Search (POSS) program, the schedule browser's ACP plan importer can import the special plans generated by the POSS scheduling system, and create plans grouped into the "grids" used by POSS to group galaxies for searching. This mode looks for #DIR statements in the plan, and for each one of those, a new Plan is created. Then all of the targets following that are imported as Observations for that plan, immediately following each other. The effect is that each POSS grid is turned into a Scheduler Plan, which may consist of many galaxy Observations, all of which must be acquired as a unit. POSS requires that a grid be 100% acquired or it is not usable to their post-processing pipeline.
For POSS mode imports, two special features are automatically enabled in all ImageSets, for efficiency:
You can save and restore any of Scheduler' request data objects (Projects, Plans, etc.) using its import/export feature. The files produced by this feature are XML, but they are private in structure. Do not create or edit these documents!
Scheduler exported data is dependent on the database schema, which can change when new features are added to Scheduler. It's possible that data exported from older database versions will not import into a newer database. We try to preserve compatibility, but sometimes an incompatible change can't be avoided. Therefore, it's best to use exported data for short term needs.
Import and export of individual objects is done using the corresponding right-click menu items in the tree or the Observer bars. Each exported object is saved in a separate XML file. Use a naming convention that will allow you to tell which type of request data object is stored in an export file.
When importing a request data object, its info is added to the database as a child to the object you clicked to get the right-click menu. For example, if you import a Plan, it will be a child of the Project you right-clicked on. The menu text guides you in this regard.
You can repeatedly import the same object to quickly add objects of a similar nature, then edit them in the browser to adjust each to your needs.
You can also export the entire scheduler database, and later recreate the exact state by importing. When you import an entire database the previous contents are replaced by the imported data. You will be warned of this before importing a database. Importing and exporting the entire database is accessed through the corresponding items in the browser's Browser menu.
Scheduler exported data is dependent on the database schema, which can change when new features are added to Scheduler. It's possible that data exported from older database versions will not import into a newer database. We try to preserve compatibility, but sometimes an incompatible change can't be avoided. Therefore, it's best to use exported data for short term needs.