Installing the Guide Star Catalog via Download
The Guide Star Catalog 1.1 is available for downloading at the DC-3 Dreams GSC Download Site. This page contains help on:
Doing it the Easy Way: Self-Contained GSC Setup Package
If you have a decent internet connection, the easiest way to get the GSC installed is to download our self-contained GSC setup lackage. Save it anywhere and run it. That's all there is to it.
Downloading the Individual Files
If you have a poor internet connection, you can download the files individually. The objective is to recreate the original compressed-FITS STScI Guide Star Catalog 1.1 on your disk:
- Pick a location for the catalog on your hard drive. For example, create a folder C:\GSC11.
- Within that folder create two (sub) folders \tables and \gsc. For example
    C:\GSC11\tables
    C:\GSC11\gsc
- Download the three tables files from the /tables folder on the GSC web site to the \tables subfolder you just created on your hard
drive (step 2).

We do not recommend you use Internet Explorer to download the files. If you do use Internet Explorer, you
must
- Right-click the table file links and choose "Save target as...". Otherwise, MSIE will insist on displaying these files as gibberish, and corrupting them in the process.
- IE adds ".txt" to the names of the downloaded table files. You must manually remove these gratuitous additions to their names. If you have "hide extensions of known file types" you won't even be able to see them! So you need to turn this feature off in Windows Explorer options, advanced.
For example:
    C:\GSC11\tables\LG_REG_X.TBL  (not .TBL.txt! See note above)
    C:\GSC11\tables\REGIONS.TBL
    C:\GSC11\tables\SM_REG_X.TBL
- Download all of the zip files from the /gsc folder on the GSC web site to the \gsc subfolder you just created on your hard drive (step 2). for example
    C:\GSC11\gsc\n0000.zip
    C:\GSC11\gsc\n0730.zip
    ... etc.
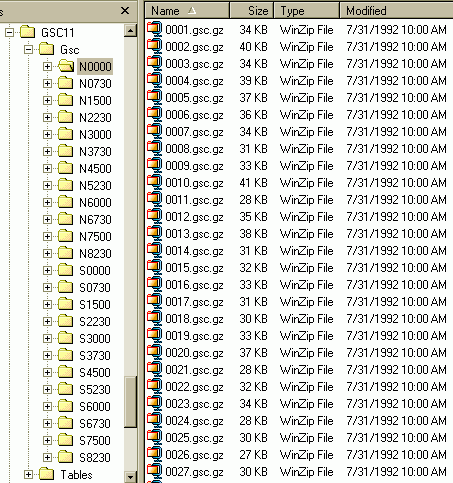
- Unzip the files retrieved in step (4) with folders preserved!!! and with the destination folder set to the local \gsc folder that contains the zip files. Here's where you'll make a mistake if you aren't careful!. For example, after unzipping n0000.zip, you should have the following directory structure:
    C:\GSC11\gsc\n0000\0001.gsc.gz
    C:\GSC11\gsc\n0000\0002.gsc.gz
    C:\GSC11\gsc\n0000\0003.gsc.gz
    ... etc.
 Do not decompress the individual .gz files
- Now use the Windows Explorer to look at your catalog directory structure. It should look something like this:
.
- Finally, check that your Tables folder looks like this (check the dates and file sizes):
.
Using the GSC Installer
Once you have re-created the Guide Star Catalog on your hard drive, use the GSC Installer utility that comes with PinPoint to configure ACP, Visual PinPoint, and MaxIm DL's catalog settings to use this catalog:
- Start the GSC Installer (Start menu, under ACP Observatory Control)
- Turn on Configure ACP and MaxIm DL
- Under Catalog Location, choose "Use from hard disk"
- Click "Setup GSC Catalog"
- Using the Browse for Folder window that appears, select the folder you created in Step 1 of the previous section (for example C:\GSC11).
When the process completes, ACP, Visual PinPoint, and MaxIm DL are properly configured and the catalog's integrity has been verified. If you wish, you may now delete the originally downloaded zip files (e.g., n0000.zip).
Copyright © 2000-2007, Robert B. Denny, Mesa, AZ

