Visual PinPoint's blink window is designed to assist you in rapid review of automatically detected moving objects, and to allow you to mark and report objects manually. The display (color palette and base image contrast) are adjustable on the Blink Settings window. Normally you will never need to change the base contrast settings, as Visual PinPoint has an excellent adaptive image stretching feature.
Images are always displayed "North up", thus the images may appear rotated if your camera is not positioned for north up. Any number of images may be blinked, even just one (for measuring locations of objects on a plate).
A blinking rate slider and keys 1-9 are provided to adjust the switching rate. When set to 0 (no switching) the F6 and F7 keys provide manual cycling between frames. The corresponding image file name for a frame will appear in the title bar. A magnifier with adjustable magnification is provided to allow close inspection of the area under the mouse. Finally an orbit classification display is provided to assist in identifing "interesting" moving targets.
While blinking, as soon as the mouse is clicked in the image area, blinking stops. As you move the mouse, notice that the X/Y and RA/Dec coordinates displayed at the top will "snap-to" the nearest object. This shows you info on the objects that PinPoint detected. To release the snap-to behavior, hold down the [Shift] key while moving the mouse. This will show the X/Y and RA/Dec coordinates of the mouse location. NOTE: With snap-to disabled, the reported coordinates are only accurate to 1 pixel. Typically this is not good enough for astrometric reporting! PinPoint is capable of 0.1 pixel resolution on position when it detects an object.
The following keyboard commands are supported by the blink window:
| Key | Action |
|---|---|
| 1-9 | Adjust blinking rate (changtes the rate slider) |
| 0 | Stop blinking (speed = 0) |
| F6 | Step back one frame (cycles to last frame after first frame) |
| F7 | Step forward one frame (cycles to first frame after last frame) |
| F3 | Switch between normal and inverted gray-scale (white sky, black objects) |
| F4 | Decrease contrast of display |
| F5 | Increase contrast of display |
| Shift | (1) Release "snap-to" of coordinates under mouse (reduces accuracy!). (2) Allow adding MPC publishable note when clicking [Accept] or [Report]. |

If any objects were detected automatically, the blink window first appears with the three buttons shown on the image to the right and the first automatically detected object is marked in each frame by yellow reticles. The other (as yet unreviewed) automatic detections are marked with blue reticles.
To accept a detection (and have it included in the MPC report), click [Accept]. To include an MPC publishable note with an observation, hold down the [Shift] key when clicking [Accept]. To reject a detection and go on to the next (e.g., it is a false detection), click [Reject]. If you want to skip all remaining automatic detections and proceed to manual marking, click [Manual].
Once all automatic detections have been reviewed and either accepted or rejected, or if the Manual button is clicked, the blink window switches to the manual detection mode (see the next section). If you want to stop blinking completely, click the [X] box in the upper right corner of the blink window.

Once in manual mode, the three buttons change to those shown in the image to the right. Click on the object to be marked on a frame and a yellow reticle will appear at its astrometric position. If the reticle appears on a nearby object, the one you tried to mark was not detected by PinPoint. Adjust your detection sensitivity settings to go deeper (at the possible cost of more false detections).
Mark an object on at least one frame (usually on all frames). Then click [Report] to add the marked/reported positions for this object to the MPC report. To include an MPC publishable note with an observation, hold down the [Shift] key when clicking [Report]. Once you report a manual detection, the window will again start blinking and the just-reported positions will appear with blue reticles (so you can avoid re-reporting them). Repeat this cycle for each object that you want to report manually.
When you have finished marking and reporting objects manually, click [Done]. The MPC report will appear in Notepad (with additional tracing information if you selected Tracing Level other than None in the Find Astroids window).
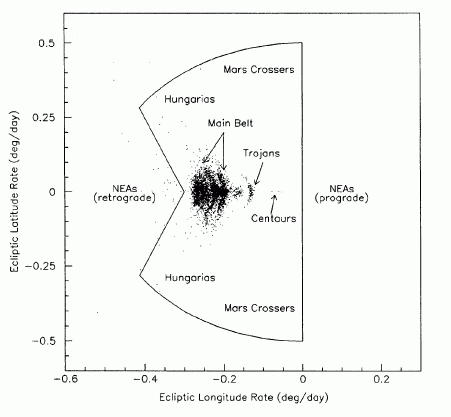
The figure below shows a detailed version of the blink window's orbit classification display. This can help you to identify the type of automatically detected body that is currently up for review. All automatic detections will show in the display as dots, with the current object as a red dot and the others as black dots. The classification is based on rates of motion in the ecliptic coordinate system. For more information on this technique, see Detection of Near Earth Asteroids Based on Their Rates of Motion, R. Jedicke, Astron. J., 111, pp 970-982 (PDF, this will take a long time to load).
