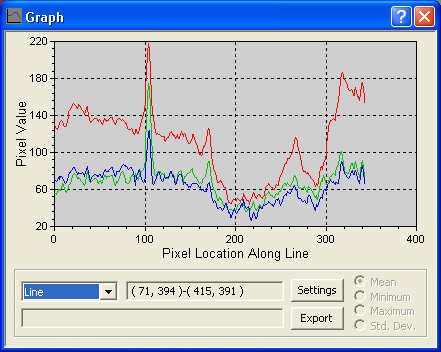
The Graph window displays a graph of data derived from an image using one of seven techniques, including:
Line
Horizontal Line
Vertical Line
Horizontal Box
Vertical Box
Area
Histogram
Star Profile
Availability of this feature depends on Product Level.
The window works as a floating window or ”toolbox”. When it is open, all other program functions are available and you can switch between images just by clicking on them. Also, the line profile window can be resized by dragging the raised border with the mouse. Within limits, you can make the graph as large or as small as you wish.
Note: when using Line Profile in certain modes, the usual box drawing functions of the mouse cursor are changed. You may wish to turn off the Line Profile command when using other functions.

For most graphing modes, you can select the portion of the image to be graphed using the mouse. Point at the start position then press and hold the left mouse button. Drag the mouse to the end position and release it. The selected coordinates will be displayed in the status window near the bottom of the window. Some modes require a single click instead of a drag operation.
Lines drawn on the image can be moved and resized using the cursor. Grab a corner of a box to resize it, or grab the end of a line to reorient it or change its length. You can also move the entire box or line by grabbing it with the mouse anywhere except on the ends or corners.
If you point the mouse at the line graph, a vertical cursor will be displayed. The brightness level at that point in the graph will be displayed at the bottom of the dialog box (bottom, right of center), along with the corresponding image coordinates. A tic mark will also be shown on the image itself in the corresponding position.
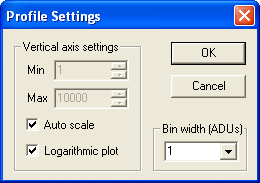
The Settings button allows you to set up the vertical plot axis. You can use Auto Scale (default) or enter the Min and Max values explicitly, and you can specify that the data be plotted logarithmically. In Histogram mode, an additional Bin width (ADUs) control appears, as shown on the right; it is described below.

The Export button allows you to save a comma separated variable (CSV) file, which can be imported into other applications such as spreadsheets. Each line of the exported file contains the data for a single point on the graph: a spatial coordinate ("Pixel Location along X" [or Y]), followed by its pixel value, a single number for monochrome images or three values in the sequence red, green, and blue for color images. The format for exported Area Plot and Histogram data is slightly different and is given with the description of those modes.
Graphing Modes
The available modes of operation are as follows:
Line
This is the normal mode of operation. When the mouse cursor is dragged across the image, a line is drawn from the start to end point. The graph represents the pixel values along that line. The line can be moved and resized using the mouse.
Horizontal Line
In this mode, clicking anywhere on the image will select a horizontal line extending the full width of the image. Dragging the mouse will simply move the line up and down. As for Line mode, the graph represents the pixel values along that line.
Vertical Line
In this mode, clicking anywhere on the image will select a vertical line extending the full height of the image. Dragging the mouse will simply move the line left and right. As for Line mode, the graph represents the pixel values along that line.
Horizontal Box
When the mouse is dragged a box will be drawn on the image. The values inside the box will be combined vertically (column by column) and the results plotted for each column across the box horizontally. The box can be resized and dragged using the mouse. Tip: to drag a square box, hold down the ALT key.
The pixels can be combined using either Mean (average), Minimum, Maximum, or Std. Dev. (Standard Deviation).
Vertical Box
When the mouse is dragged a box will be drawn on the image. The values inside the box will be combined horizontally (row by row) and the results plotted for each row across the box vertically. The box can be resized and dragged using the mouse. Tip: to drag a square box, hold down the ALT key.
The pixels can be combined using either Mean (average), Minimum, Maximum, or Std. Dev. (Standard Deviation).
Area Plot
When operating in Area Plot mode, a 3-D representation of a portion of the image is displayed. A region must first be selected; nothing will be displayed until you select a rectangular region for display. To select a region, use a mouse to dragg a box on the image. Holding the ALT key will force it to be square.
Exporting an Area Plot creates a file containing either three or five values per line, for monochrome and color images respectively. The first two values are always integer and are the X and Y coordinates of a pixel within the region of interest. The remaining value(s) give the value for the single monochrome or three color channels (red, green, and blue). The data points are recorded left-to-right and top-to-bottom with the X axis changing fastest.
Histogram
Histogram mode plots the distribution of pixel intensities in the selected area of the image or the whole image, if no rectangle is present. The range of intensities from the faintest to the brightest pixel in the selected area is divided into ”bins” (discrete levels) of uniform size using the Bin width (ADUs) control on the Settings dialog. You can either type a numerical value, select one from the drop list, or pick Auto to have MaxIm DL determine a reasonable value. Auto never sets the width to less than 1.0 ADU since this results in regular gaps in the graph for integer-valued image data, but you can type in fractional values explicitly. The number of bins required varies inversely with the Bin width; both quantities are displayed in the box near the bottom of the Line Profile window when the mouse is not over the graph.
When the number of bins is less than one-third the width of the graph, the histogram is drawn in the traditional ”stair-step” fashion. If the number of bins is larger than this, only one (X,Y) point is plotted per bin and the graph will usually appear jagged. Histograms are usually drawn in Logarithmic plot mode.
An exported histogram has one line for each bin, containing the smallest intensity that would be mapped to it, followed by the number of pixels in each plane that actually fell into it.
Star Profile
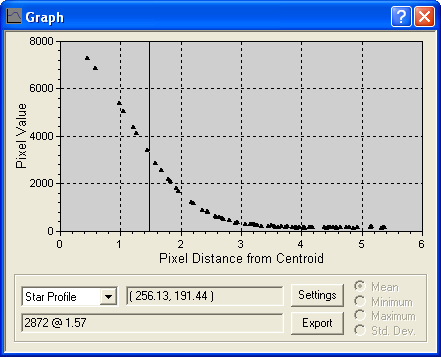
In the Star Profile mode, you must click on a star anywhere in the image. The centroid for that star is first calculated. Then the radial distance to each nearby pixel is measured, and the value of that pixel is plotted against the distance from the centroid.
