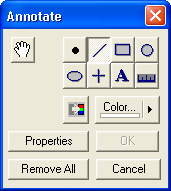
Images can be annotated with Lines, Points, Boxes, Circles, Ellipses, Crosshairs, Text, and Rulers.
Availability of this feature depends on Product Level.
Select the annotation's shape by clicking one of the eight push buttons. The available shapes are Point, Line, Box, Circle, Ellipse, Crosshair, Text and Ruler. The shape associated with each push button is given below.
![]() Point
Point
![]() Line
Line
![]() Box
Box
![]() Circle
Circle
![]() Ellipse
Ellipse
![]() Crosshair
Crosshair
![]() Text
Text
![]() Ruler
Ruler
If the image is monochrome, then the Colorize button ![]() will be enabled. Clicking this button will transform the current image buffer from a monochrome image to a color image. The resulting color image will appear the same as the monochrome image, with all three color channels set to the same values as the input image. Once the image is changed to color the button is disabled.
will be enabled. Clicking this button will transform the current image buffer from a monochrome image to a color image. The resulting color image will appear the same as the monochrome image, with all three color channels set to the same values as the input image. Once the image is changed to color the button is disabled.
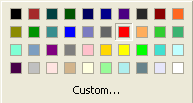
The Color button ![]() is enabled for both monochrome and color images. Clicking it displays a color palette that allows you to select the color of the next shape to be placed into the image. If the image is monochrome, the palette contains a series of shades of grey; if it is color, the palette contains a selection of colors. The Custom... selection is only available for color images. Clicking it will display a standard Windows color dialog that allows you to specify the exact red, green and blue values for the color.
is enabled for both monochrome and color images. Clicking it displays a color palette that allows you to select the color of the next shape to be placed into the image. If the image is monochrome, the palette contains a series of shades of grey; if it is color, the palette contains a selection of colors. The Custom... selection is only available for color images. Clicking it will display a standard Windows color dialog that allows you to specify the exact red, green and blue values for the color.
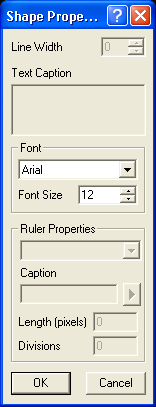
After choosing the shape type, place it by clicking at the desired location on the image. The size of Points, Text and Rulers is controlled by dialog settings; for the others, drag out the shape to the desired size. Placing a Text label automatically displays the Shape Properties dialog; enter the Text Caption and optionally Font and Font Size, then click OK.
The properties for new annotations can be set up using Properties. The features available depend on the current drawing mode.
You can edit an individual annotation by right-clicking on it and selecting Properties, or delete it by selecting Remove on the right-click menu. Click and drag on the endpoints of lines or corners of boxes to resize them; click and drag elsewhere on the annotation to move them. Circles and ellipses can be moved but not resized; both the outside and inside ends of crosshair bars can be dragged, controlling diameter and interior gap size respectively. You may wish to select the hand tool ![]() first; while moving and resizing annotations can be done with any of the normal annotation-drawing tools active, selecting the hand prevents inadvertently adding an unwanted new annotation.
first; while moving and resizing annotations can be done with any of the normal annotation-drawing tools active, selecting the hand prevents inadvertently adding an unwanted new annotation.
You can remove all annotations by clicking Remove All. Clicking OK makes the annotations permanent: they become part of the image and can no longer be edited. (They can still be removed with Undo until another processing command modifies the image further.) If you click Cancel, you will be asked whether to make the annotations permanent or not.
The Shape Properties dialog box allows you to select the Line Width, Text Caption for text annotations and rulers, the Font and Font size for text annotations and rulers, and the Ruler Properties.

To add a new ruler, click the arrow button ![]() and select Add. This brings up the Ruler Properties dialog box. You can set the Ruler Name, which will appear in the drop list. You also need to set a Caption, which can be different from the name, a Length (pixels), and the number of Divisions (tics) on the ruler.
and select Add. This brings up the Ruler Properties dialog box. You can set the Ruler Name, which will appear in the drop list. You also need to set a Caption, which can be different from the name, a Length (pixels), and the number of Divisions (tics) on the ruler.
To delete a ruler, select it with the drop list, click the arrow button, and select Delete. To edit an existing ruler, select it with the drop list, click the arrow button, and select Edit.