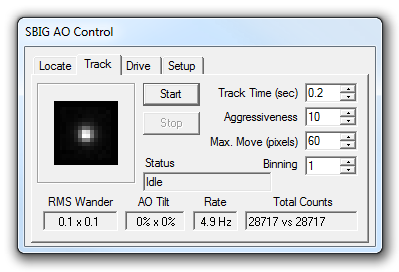
The Track tab is used to start and stop the AO autoguider, and to monitor its performance. Before the AO can start autoguiding a guide star must be selected using the Locate tab.
Use the Binning check box to change the image binning. This allows you to effectively increase the star brightness and decrease the exposure time. The maximum binning allowed or cameras with a TC211 guide chip is 2x2, for TC237 guide chips, 3x3. Due to the small pixel size of the chip, it is recommended that you use at least 2x2 binning when tracking with a TC237.

The Track Time is the duration of the tracking exposure, and this will determine the update rate at which the AO can correct for stellar wander. This can only be changed when the AO is idle.
The Aggressiveness is a scaling factor used to refine the amount of correction applied when the guide star is off center. The required correction in pixels is multiplied by the Aggressiveness divided by 10. Therefore if the Aggressiveness is set to 5 and a correction of 6 pixels is required to center the guide star, the AO optic will tilt such that the star is moved 6 x 5 / 10 = 3 pixels towards the center. If the Aggressiveness is set too high (>10) the star may oscillate, too low and the system will be slow to respond to stellar wander. You can adjust Aggressiveness while the AO is tracking; set it to a value which minimizes the RMS Wander. A value of 6 to 8 usually provides optimum tracking.
The Max. Move field sets the maximum correction in pixels that can be applied in a single cycle. (Note that the absolute maximum deflection the AO unit can accommodate is about +/- 15 pixels for an ST-7 or ST-8). Lowering Max. Move will allow the AO to ignore large fluctuations occasionally caused by brief wind gusts that are too fast to track out. Decreasing this value too much will reduce the effectiveness of the AO. As with the Aggressiveness setting, this field can be adjusted while autoguiding and should be used to minimize the RMS Wander.
Clicking on the Start button will initiate autoguiding on the star that was selected using the Locate tab. Before the small tracking image is displayed in the dialog, the computer will accumulate eight dark frames in order to have a low noise dark frame to subtract from the short duration light frames. The autoguiding can be stopped at any time by clicking on the Stop button.
The image of the guide star, magnified 400%, will be continuously updated while autoguiding. As well, the values for RMS Wander, the AO Tilt position, the update Rate and the Total Counts will be updated.
The RMS Wander is the average deviation of the guide star from the center position, and is measured in pixels. Minimizing this value will improve the quality of the main exposure by minimizing the spot size of the stars.
The AO Tilt displays the current AO optic tilt (in percent) in the X and Y directions. When autoguiding commences the optic is set to the home position (i.e. 50% x 50%), which is the same position used when locating a guide star with the Locate tab.
The update Rate is measured in Hertz and is the number of full cycles (each cycle comprising image acquisition, image download, processing, optic tilt and display update) completed per second. The update Rate will generally be limited by the Track Time, however for short track times (< 0.05 sec) the image download and optic movement times will have a greater impact on performance. Note that slightly faster update rates can be achieved by guiding on a star located near the top edge (but not too near!) of the guide chip, since the download time is slightly shorter. A larger improvement in the update rate can be achieved by reducing the Track Box size on the Setup tab.
The Total Counts field displays the current number of counts accumulated in the Track Box during the Track Time versus the number of counts accumulated in the initial tracking image. The number of Total Counts will be proportional to the guide star's brightness.