Not to sound like a broken record, but you should read this to the end, or risk getting frustrated or missing some important features!
If you're new to Starry Night, you've probably already discovered that the display options are myriad and a bit confusing, plus the default display is not well suited to serious astronomy. There are a few things you can quickly do to tailor Starry Night's display more appropriately:
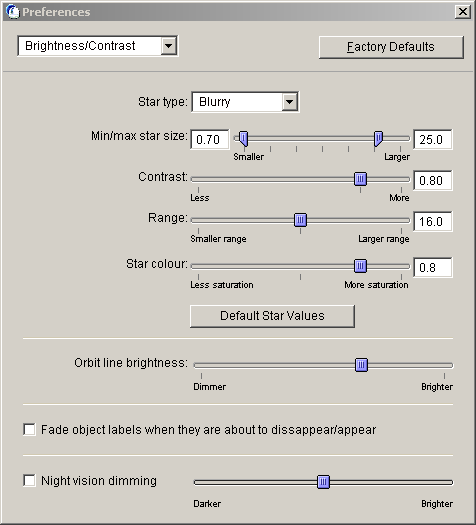
The first thing to do is adjust the Brightness/Contrast preferences. In the File menu, select Preferences, then select Brightness/Contrast. Set the various controls to the values shown in the screen shot below. Don't press the Factory Defaults button or all preferences will be reset.
This should give you a reasonable number of stars (assuming you set up the view options as described below) all the way down to mag 19 (when zoomed in to half a degree or so).
In order to ease the transition to Starry Night, ACP Planner has installed a "preset" which makes Starry Night's display suitable for serious astronomy. To activate this display setup, do the following one time:
After doing this once, Starry Night will come up with a display that is suitable for most serious astronomical use. You can turn labels of various kinds on and off using the Labels menu. Once you decide what labels you want, again save options as default, and maybe save them as a preset of your own.
If your computer is connected to the internet, you can have Starry Night automatically download faint stars (> mag 16) when you zoom in. These downloaded stars (from the USNO A2.0 catalog) are cached on your hard disk, so if you zoom back into the field again they will already be there for display.
To activate this feature, select Automatic Star Downloads in the LiveSky menu.
ACP Planner uses the Graph display as a way to tell what's up and to move time around. With Starry Night running, drag open the Graph display using the splitter handle at the top of the planetarium display. you will see the time and the altitude curves of the Sun and Moon. To add other objects to the graph, right-click on the object and select Start Graphing. To remove an object from the graph, right-click its name in the Graph Items area and select Stop Graphing. You can remove the Sun and Moon this way. To move time around, drag the graph left and right. The sky will smoothly rotate around the equatorial axis.
Starry Night's standard use for the mouse wheel is for zooming the display. You can also click on the clock display (we suggest clicking on the minutes part) and roll time back and forth with the mouse wheel.
With the addition of ACP Planner, however, more mouse wheel options become available. By using the wheel button, or combinations of the Shift and Control keys, you can roll time back and forth without being over the clock display. For example, by rolling the mouse wheel with the Shift key held down, time will step 5 minutes per wheel-step. The table below shows the time steps that are available and the corresponding key combinations:
| Key Held Down | Time Step |
|---|---|
| Shift | 5 Minutes |
| Wheel Pressed | 5 Minutes |
| Control | 30 Minutes |
| Shift + Control | 1 hour |
| Wheel Pressed + Control | 1 hour |
Note that pressing down the mouse wheel is the same as holding down the Shift key.
If you're using Planner to make plans for an observatory in another time zone, you should enable the "Local time at observatory..." option in Planner's Preferences. This will cause the (local) times shown in Planner to match those in Starry Night for the remote observatory. You don't need to fill in the "[ ] hrs from UTC" field because Planner grabs the UTC offset in effect for the current Starry Night window automatically. However, if you plan to add targets manually (not via Starry Night) that field needs to be filled in with the UTC offset for the observatory including the current daylight time offset.