Adding and Editing Targets
While ACP Planner is designed to work within Starry Night or TheSky, you can add targets and their image sets manually. This form is also used for editing previously added targets (see Fig. 1 below). Right click in the target list and select add or edit.
- Give the target a name for your plan. See below, for some target types the name is significant.
- You can specify the target's J2000 coordinates, ask ACP to find them at run time, or for the first target in the plan only, tell ACP to start acquiring images at the current telescope coordinates, a "manual" (no-slew) target.
There are buttons to select the target type (see Fig. 1 below):
- Coordinate entry: Fill in the J2000 coordinates (decimal or virtually any sexagesimal format).
- Get coordinates from image: Click the "From Image" button and select a plate-solved FITS file. The precise coordinates from that image will be entered for you. Use this to return precisely to a location at which a previous image was acquired.
- Deep sky catalog lookup: The target name must be a valid ACP deep-sky catalog name. A Search Names button will appear and you can validate the name with the same catalog that ACP uses. Otherwise, if you have access to a Share Your Sky! ACP-based remote observatory, log on and use the deep sky catalog service to make sure. The Messier objects are entered as "M xx" with a space between the M and the number. Not supported for RTML export to Scheduler.
- Minor Planet elements: The target name must be a valid minor planet name, number, or MPC designation. At the observatory, ACP will retrieve the orbital elements of the body and calculate its precise position at image acquisition time.
- Major Planet: The target name must be the name of a major planet (not the Moon). At the observatory, ACP will retrieve the orbital elements of the body and calculate its precise position at image acquisition time.
- Current Telescope Position: This will create a "manual" (no-slew) target in the ACP Plan. This must be the first target in the plan! Not supported for RTML export to Scheduler.
- If the imager has a field rotator (and you have set this up in Preferences) you must enter the equatorial position angle for the images of this target.
- If you are acquiring multiple images of the target, you can tell the observatory to "dither" the images slightly. For astro-imaging, this can improve the quality of the stacked images.
- (advanced) If you want images for this target to go into a folder other than the ACP default (which is a dated folder under My Documents\ACP Astronomy\Images), you can select (and optionally create) the folder. This gets tricky. As long as your new folder is a sub folder of My Documents\ACP Astronomy\Images, your plan will run on any ACP system (local or remote). Any other location will cause ACP to put a full physical path into the plan, and the plan will not be portable. This feature is disabled if you have entered remote login info into the current Preferences profile. The assumption is that you are planning for a remote observatory and cannot specify physical disk paths.
- Set the (local) time at which imaging this target is to start. This may be more than 24 hours in the future, but be careful with this!
- (optional, only if exporting to RTML for Scheduler) Enter the minimum altitude above which Scheduler will consider the target to be eligible.
- Click OK to close the Add Target to Plan window.
You will be warned if your start time overlaps another target when you click OK, and the Add Target to Plan window will stay open.
- You may now enter your image sets for the newly added target.
- Click Update to save the image sets.
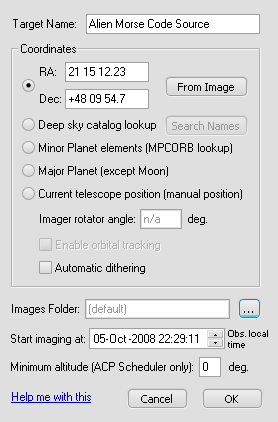
Fig. 1 - Add/Edit Target Window
Ripple Editing
If you move the starting time of the target to a later time, or increase the imaging time for the target, such taht it now overlaps the next target's start time, Planner will offer you the option of pushing the start times of subsequent targets later to make room.
ACP Manual (no-slew) Targets
ACP supports a special manual target type. This is useful for astro-photography applications where the telescope is manually positioned on a target at the beginning of the evening. The images for this target are acquired without moving the telescope. The plan may contain additional targets following the manual one; the manual one must be the first in the plan.
Copyright © 2005-2009, Robert B. Denny, Mesa, AZ