Using Simulators
When the weather is bad, or when you want to practice using the system and/or allow web users to practice and learn the system, all without needing live sky exposures, you can use the simulators. Everything is exercised including the pointing corrector, filters, autoguider, plate solving, pointing updates... everything. No shortcuts are taken!
Additional information is given below. To run ACP entirely with simulators:
- Start MaxIm DL, open the CCD control window and select Simulator for the Camera 1 and Camera 2.
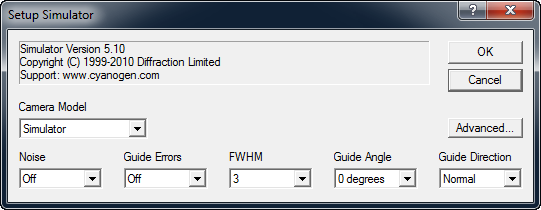
- Camera 1 will be the main camera. Click Setup Camera for Camera 1. Set it up for a FWHM of 3 pixels and no noise or guide errors.
-
Click the Advanced... button and set up the array and pixel sizes to match those of your real camera (or just pick some reasonably large format like we did below).
- Camera 2 will be the guider, click Setup Camera for Camera 2. Set it up as shown below, enable "both" guide errors and pick a FWHM of 5. No need for noise. Leave the guide direction and angle alone.
- Click the Advanced... button and set up the array and pixel sizes to match your guider (see the image in step 3 above).
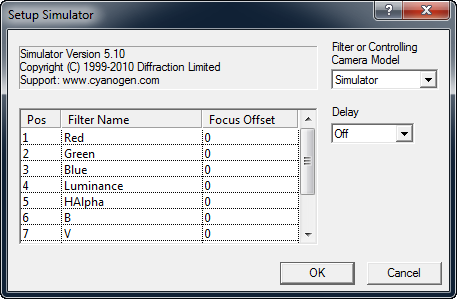
- For Camera 1 (the main camera) click Setup Filter and enter some filters, preferably named and ordered just like your real filter wheel. If you plan to leave some slots blank, be sure to remove any name from those slots and make them the last ones in the list. Unoccupied filter slots must not have any names in them. This is how ACP tells which slots are live.
- At this point MaxIm is set up, but you need to calibrate the simulator guider. We'll omit the details here, refer to MaxIm help if you don't know how. It's really easy, there will already be a guide star on the chip so just do the locate exposure then the calibrate process. After it is done calibrating, enter the track mode and verify that it guides with simulated guider errors.
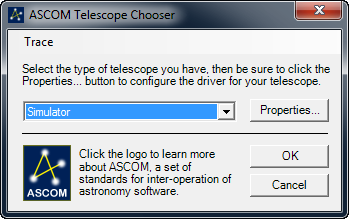
- Start ACP, in the Telescope menu, select Setup. Choose the Simulator.
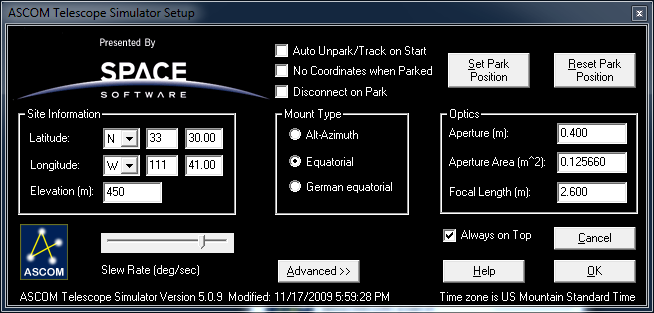
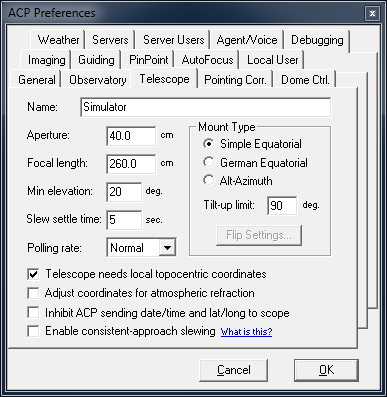
- Click Properties... to display the scope simulator setup window. Note the settings in the image below. Be sure to enter your site's latitude and longitude. Select Equatorial for a fork mount or German Equatorial for a GEM, your choice. Here we have it set up for a fork mount. Enter your telescope's aperture and focal length. The aperture area is not important but you can calculate it via pi r squared (r is half the aperture). If you want things to go really fast, select a high slew rate (like 40). This causes the simulator to perform fast slews.
- Click the Advanced>> button. This will seem intimidating, but just copy all of the checkbox settings as shown.
Click OK twice to close the simulator setup and Chooser windows.
- You will now be forced to see the ACP Preferences window, Telescope tab. Verify the settings, make sure the Mount Type is set as you want it (it should be). The other settings should be copied from the simulator but verify this also. Set the checkboxes as shown. Don't click OK just yet!
- Switch to the General tab. Turn on the Simulated star fields and pointing errors. This causes ACP's standard image acquisition scripts to substitute synthetic star fields in all images acquired via your camera or the simulator. These simulated images contain noise and Gaussian profile stars with a FWHM of 3.0 arcseconds.
The stars are taken from whatever catalog you have selected in the ACP PinPoint Preferences tab. Also, the simulated images will be generated with pre-set mechanical pointing errors (if the corrector is turned on) and random Gaussian pointing errors in each axis (except immediately following a scope sync, of course).
PinPoint will plate solve these images normally and do pointing updates as usual. The final images will have the correct star fields for the RA/Dec of the image (including pointing errors). Of course neither uncataloged stars nor deep sky objects will appear in the images.
Make sure the other settings are as shown. Try the vertical window layout, you'll probably like it best. Don't click OK just yet!
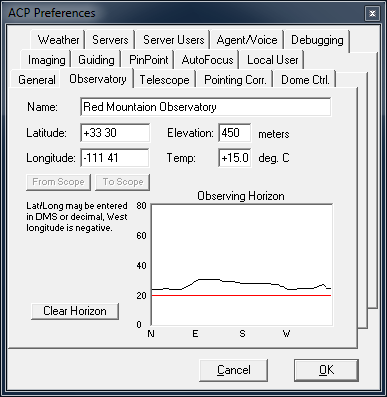
- Switch to the Observatory tab. Give your simulated observatory a name like the one shown. Enter your site's latitude and longitude (again), elevation, and 15 deg C. Draw a horizon curve to exercise the safety limits. Don't click OK just yet!
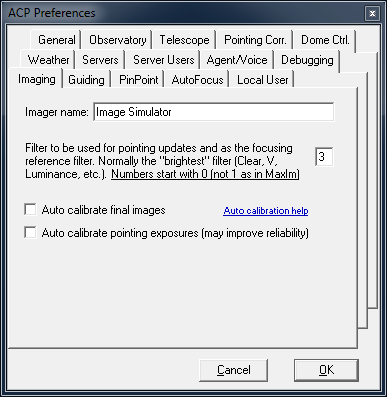
- Switch to the Imaging tab. Set the pointing update/focus reference filter slot number to 3, which is the slot number assigned to Luminance in the MaxIm filter wheel setup in (6) above. ACP's slot numbers begin with 0, MaxIm's begin with 1. Thus 3 in ACP is MaxIm slot 4. Leave the auto-calibration options turned off for now. Name your camera something like that shown. Don't click OK just yet!
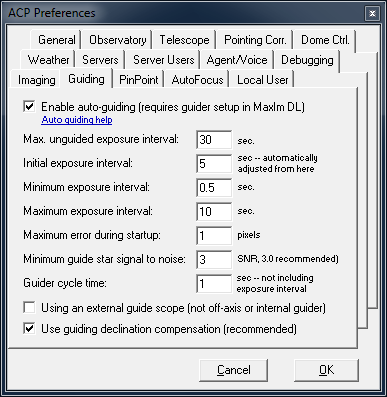
- Switch to the Guiding tab. Enter the settings shown in the image below. Note that the max unguided exposure interval is set to 30 sec. This will cause the autoguider to run for all exposures over 30 sec. Don't click OK just yet!
- Switch to the PinPoint tab. Enter the settings shown in the image below. If you used the GSC Installer, the catalog type and path should be set correctly. If not, select the catalog you will be using (GSC corrected or A2.0) and the path to the catalog root. Don't click OK just yet!
- If you have a focuser that can be used by PlaneWave PWI or FocusMax, and if you have familiarized yourself with that program, switch to the AutoFocus tab and turn on autofocus. Select the FocusMax simulator system file! Set up the FocusMax simulator to use MaxIm DL for the camera control. Leave AcquireStar and Adaptive Autofocus off. You will have to run the First Light wizard to get a V-curve. You might want to run a second V-Curve also. Don't go any further until you can click FocusMax's Focus button and have it successfully do a simulated focus run!
At this point, click OK. You can run plans (be sure they are valid for the present time or you'll get below-horizon errors), take images (they will contain only stars). Everything will run as if it were live, including the web interfaces for taking single or multiple images.
Additional Information
Copyright © 2000-2016, Robert B. Denny, Mesa, AZ