Art astronomers (astro-imagers) demand the utmost in sharp images, use long focal lengths, and take long exposures. This adds up to the most demanding scenario for autoguiding. Simply strapping a small refractor on to the main telescope is not good enough in most cases, due to differential flexure and/or mirror flop. Instead, for the most precise guiding, deviation measurements need to be taken through the primary optical axis.
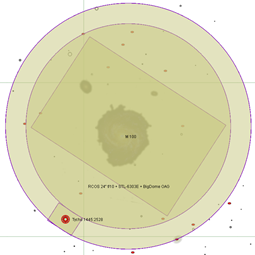
This is called off-axis guiding. It's achieved either with a separate guide sensor located next to the main sensor (SBIG) or with a guide sensor illuminated via a pickoff mirror or prism in the light path, usually ahead of the filter wheel. The latter arrangement has the advantage of allowing the guide sensor to receive all of the light available without being dimmed by filters. Off-axis guide sensors typically have a very small field of view, on the order of a few arc minutes. Thus, the chances that you can (a) place your target of interest favorably on the main sensor, and (b) get a suitable guide star on the guide sensor, are poor. The solution to this is an Imager Rotator. For more info on rotators see Using a Rotator. With a rotator, the guide sensor can be moved to any position within the annulus surrounding the main field (see the image to the right).
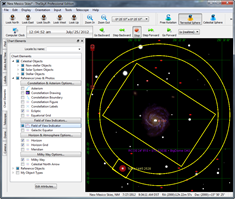
The images above and to the right show a typical field of view indicators (FOVIs). You can see the main and guide sensors graphically depicted, along with the annular guide rings that help show you where you can put the guide sensor via rotation. With ACP, you rotate the FOVI and move the sky behind the FOVI until you have the composition you want and there is a suitable guide star in the guide sensor area. Then give ACP the three coordinates (RA, Dec, PA) and ACP will take care of the rest. To see this in action, look at the video on the page Using a Rotator, then come back here.
FOVIs are available in several planetarium programs, including
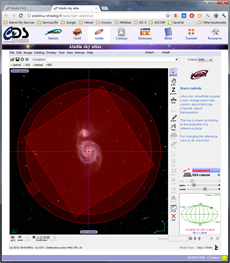
In addition the Centre de Données astronomiques de Strasbourg (CDS) has the Aladin Sky Atlas, a Java applet that runs in most web browsers. The bottom image here shows what Aladin looks like with a FOVI displayed. You can make your own FOVI for Aladin, and if you use it frequently, you can store it there permanently.
Once again, assuming you have a properly scaled FOVI, you rotate the FOVI and move the sky behind the FOVI until you have the composition you want with a suitable guide star in the guide sensor area. Then give ACP the three coordinates (RA, Dec, PA) and ACP will take care of the rest. To see this in action, look at the video on the page Using a Rotator, then come back here. If you do not have a rotator, you must determine the Position Angle of your imaging system and set that in the FOVI.
While setting up and calibrating your off-axis guider, you'll need to "get" a guide star on the guide sensor. Over the years we've seen some amazing feats of wrestling with rotators and small guide sensors, with the telescope operators trying to get a guide star on the sensor. Getting the telescope to point precisely combined with precise alignment of the rotator against the sky is just too crazy. We've watched people struggle to get a guide star, jogging the mount this way and that, hoping the star left the main field centered well enough to get to the guide field after who knows how many little jogs.
Here's how to get a chosen guide star in a couple of minutes, at any PA! We'll assume you're using ACP in the observatory via its console. This is good because killing a running plan leaves tracking on, and thus leaves the guide star on the sensor. OK...
#interval 600
#binning 2
#filter Luminance
#posang 123.4
Test-PA-123-East	21:22:34.6	+54:23:22
That's it! Do a full-frame guider exposure, or a "locate" exposure if you're using an AO, and you'll see that guide star right there. Total time, a few minutes with a bit of experience.
When you first set up your optics, or any time you change anything like adding a focal reducer, you'll need to create or adjust your field of view indicator. The idea is to end up with a properly scaled "reticle" that shows you what will appear on both the main and guide sensors. When you compose your image in the planetarium, then use the three coordinates to take images, you want the guide star to appear in exactly the same place as it does in the FOVI.
Each planetarium (including the online Aladin Sky Atlas) has its own way of creating and using its FOVIs. It's beyond the scope of this document to detail the procedures and tools for this. However, here is a general approach to the problem using ACP that will get you there in the shortest possible time. For Aladin, you'll find it far easier to get the dimensions and offsets for the FOVI using TheSky or StarryNight first, then transferring the dimensions to Aladin when you have it right.
Once you have a first cut at your FOVI, you have two tasks. In order of importance, they are
Here, the goal is to be able to put a guide star on the guide sensor rectangle in the FOVI, then using the three coordinates take an image and see the guide star actually show up in exactly the same place on the real guide sensor. You will be repeatedly using this process.
Usually it takes only 2 or three passes to get the relative locations of the main and guide sensors right on.
Getting the size of the main imager rectangle should be straightforward, though it requires some arithmetic. In step 2 of Preparation above you allowed ACP to log the true pixel scale (arcseconds per pixel). All you need now are the pixel dimensions of your main sensor and you can calculate the angular dimensions. You'll probably have to convert to arc minutes for input to the FOVI construction. If you have an SBIG imager with the guide sensor internally mounted, the focal length is already known. Ratio the pixel sizes of the main and guide sensors to get the plate scale (arcseconds per pixel) of the guide sensor, then calculate its angular dimensions given the pixel dimensions.
For an off-axis pickoff, the trick is to measure the plate scale of the guide sensor. Start by assuming that it has the same focal length and calculate like it is an internal guide sensor.